
คู่มือการใช้งาน Shippo
คู่มือนี้รวมวิธีใช้ Shippo ตั้งแต่ตั้งค่าครั้งแรก ขายหน้าร้าน จัดการสินค้าและอีเวนต์ ดูรายงาน ตั้งค่า ไปจนถึงแก้ปัญหาที่พบบ่อย
1. เริ่มต้นใช้งาน
การตั้งค่าครั้งแรก
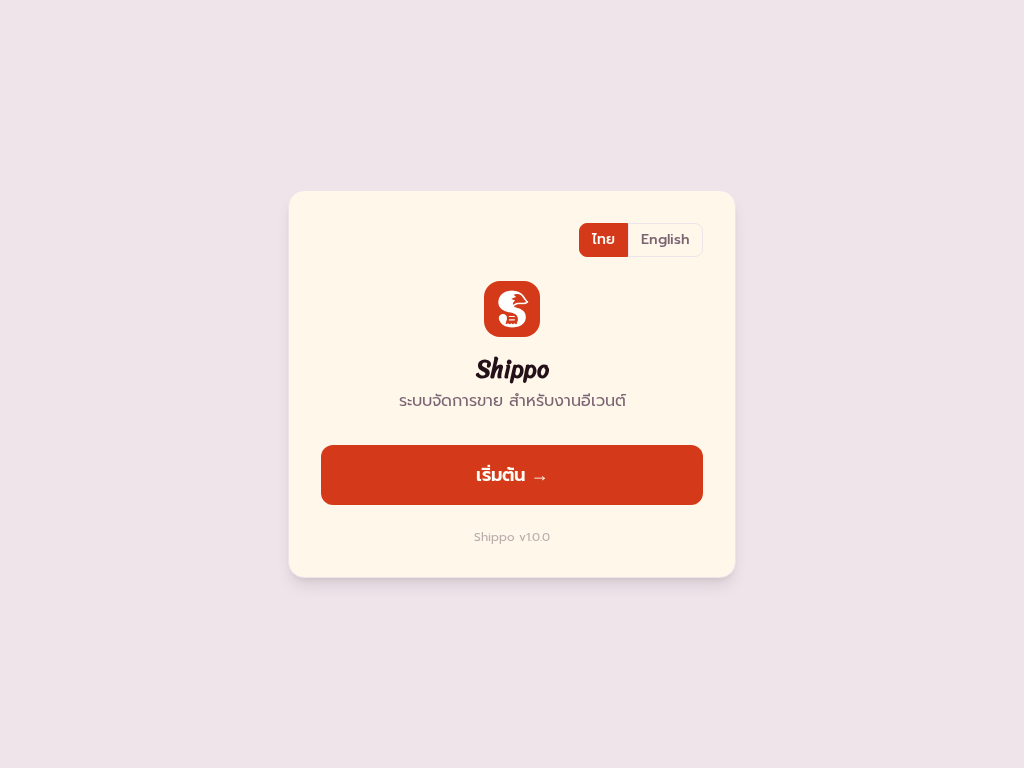
ครั้งแรกที่เปิด Shippo จะเจอหน้าต้อนรับพร้อมตัวเลือกภาษา โดยค่าเริ่มต้นจะเป็นภาษาไทย และเปลี่ยนเป็นอังกฤษได้จากหน้านี้ หน้าต้อนรับจะแสดงเวอร์ชันของแอป และมีปุ่มเริ่มใช้งานเพื่อไปต่อที่ฟอร์มตั้งค่า
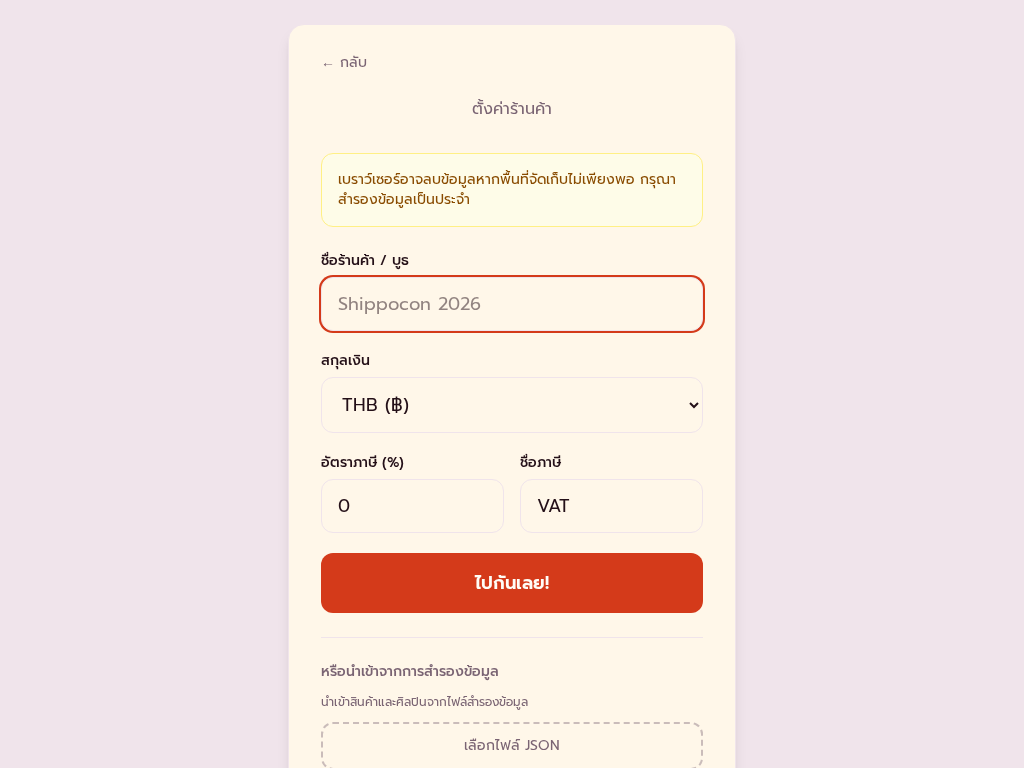
ในฟอร์มตั้งค่า ให้กรอกข้อมูลของร้านหรืองาน:
- ชื่อร้าน: ต้องกรอก ชื่อนี้จะแสดงบนหัวแอปและใบเสร็จ เช่น “Shippocon 2026”
- สกุลเงิน: เลือก THB หรือ USD เพื่อกำหนดรูปแบบราคาและยอดเงินในแอป
- อัตราภาษี: ใส่ 0-100 เปอร์เซ็นต์ ค่าเริ่มต้นคือ 0% ถ้าใส่มากกว่า 0 แอปจะคิดภาษีในใบเสร็จ
- ชื่อภาษี: ชื่อที่แสดงในบรรทัดภาษี เช่น “VAT” หรือ “Service Charge”
- นำเข้าจากไฟล์สำรอง: ใช้ไฟล์ JSON ที่เคยส่งออกไว้ เพื่อกู้คืนข้อมูลเดิม
- โหลดข้อมูลตัวอย่าง: ใช้สำหรับลองระบบหรือเดโม โดยสามารถรีเซ็ตข้อมูลในภายหลังได้
หลังบันทึกการตั้งค่า Shippo จะสร้างวิธีชำระเงินแบบ “เงินสด” และศิลปินเริ่มต้นให้ จากนั้นเปิดหน้า “ขาย” เพื่อเริ่มใช้งานได้ทันที
2. ติดตั้งเป็นแอป
การติดตั้งแบบ PWA
Shippo ใช้เทคโนโลยี Progressive Web App หรือ PWA จึงสามารติดตั้งจากเบราว์เซอร์แล้วเปิดเหมือนแอปทั่วไปได้ หลังติดตั้งแล้วจะมีไอคอนของตัวเอง เปิดแบบไม่มีแถบที่อยู่ของเบราว์เซอร์ และยังใช้งานออฟไลน์ได้หลังจากโหลดเว็บแอปไว้แล้ว
วิธีติดตั้งขึ้นอยู่กับอุปกรณ์ตามนี้:
- Chrome หรือ Edge บนเดสก์ท็อป: กดไอคอนติดตั้งในแถบที่อยู่ หรือเลือก “ติดตั้ง” จากเมนูเบราว์เซอร์
- Chrome บน Android: ใช้ “เพิ่มไปยังหน้าจอหลัก” หรือ “ติดตั้งแอป” จากข้อความแจ้งหรือเมนูเบราว์เซอร์
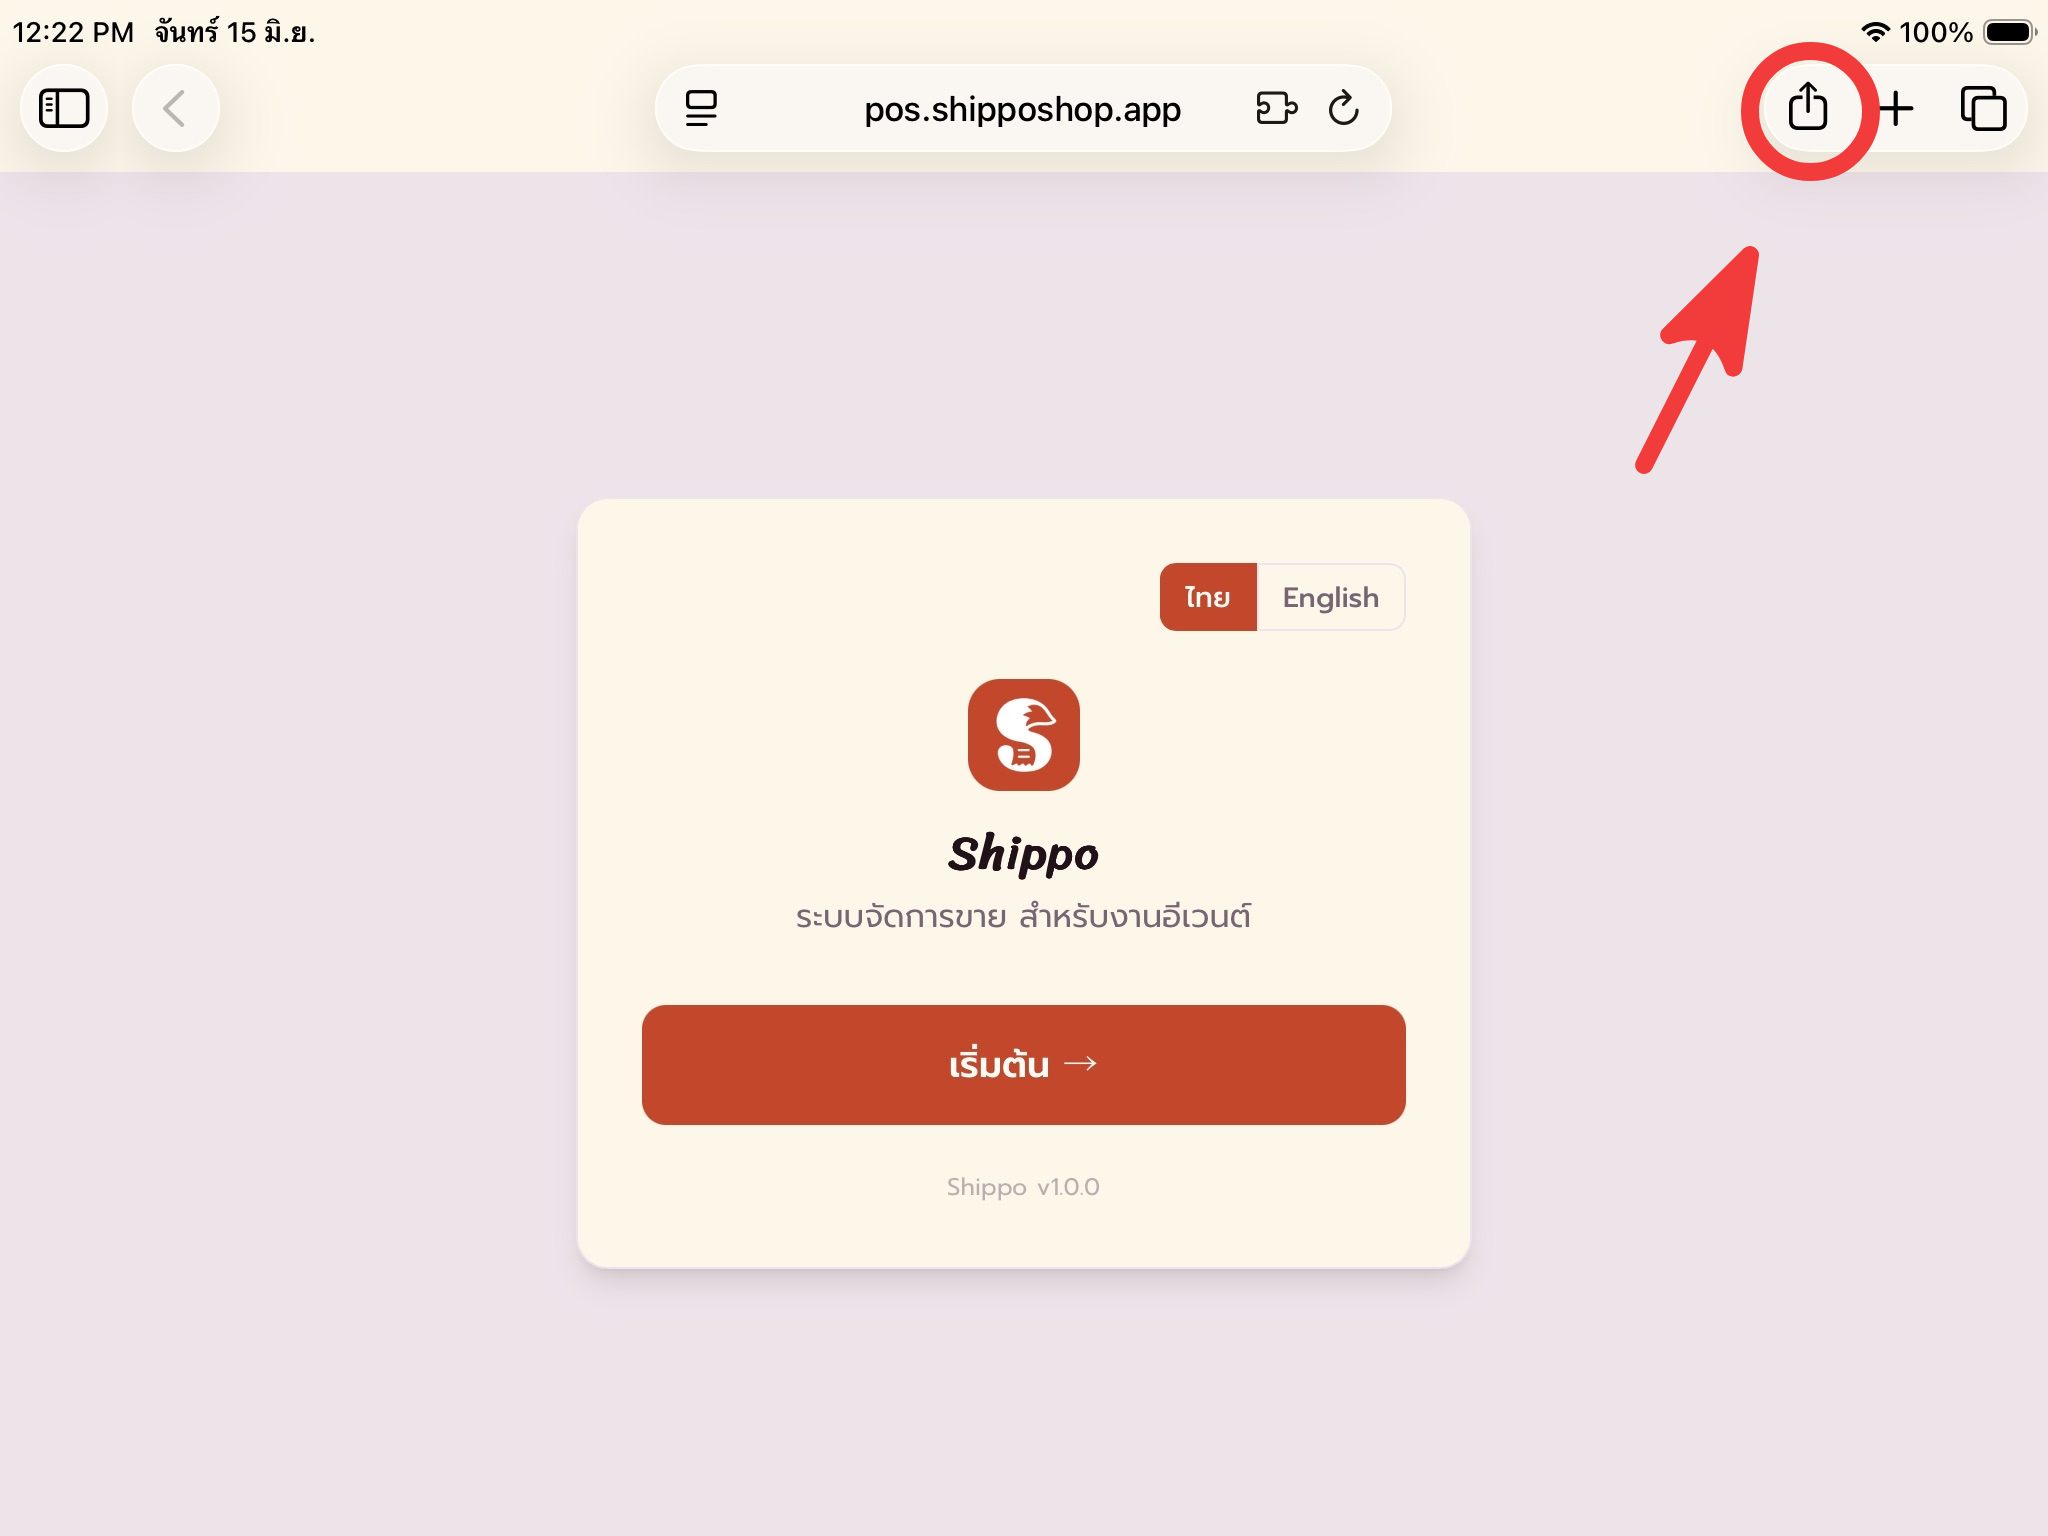
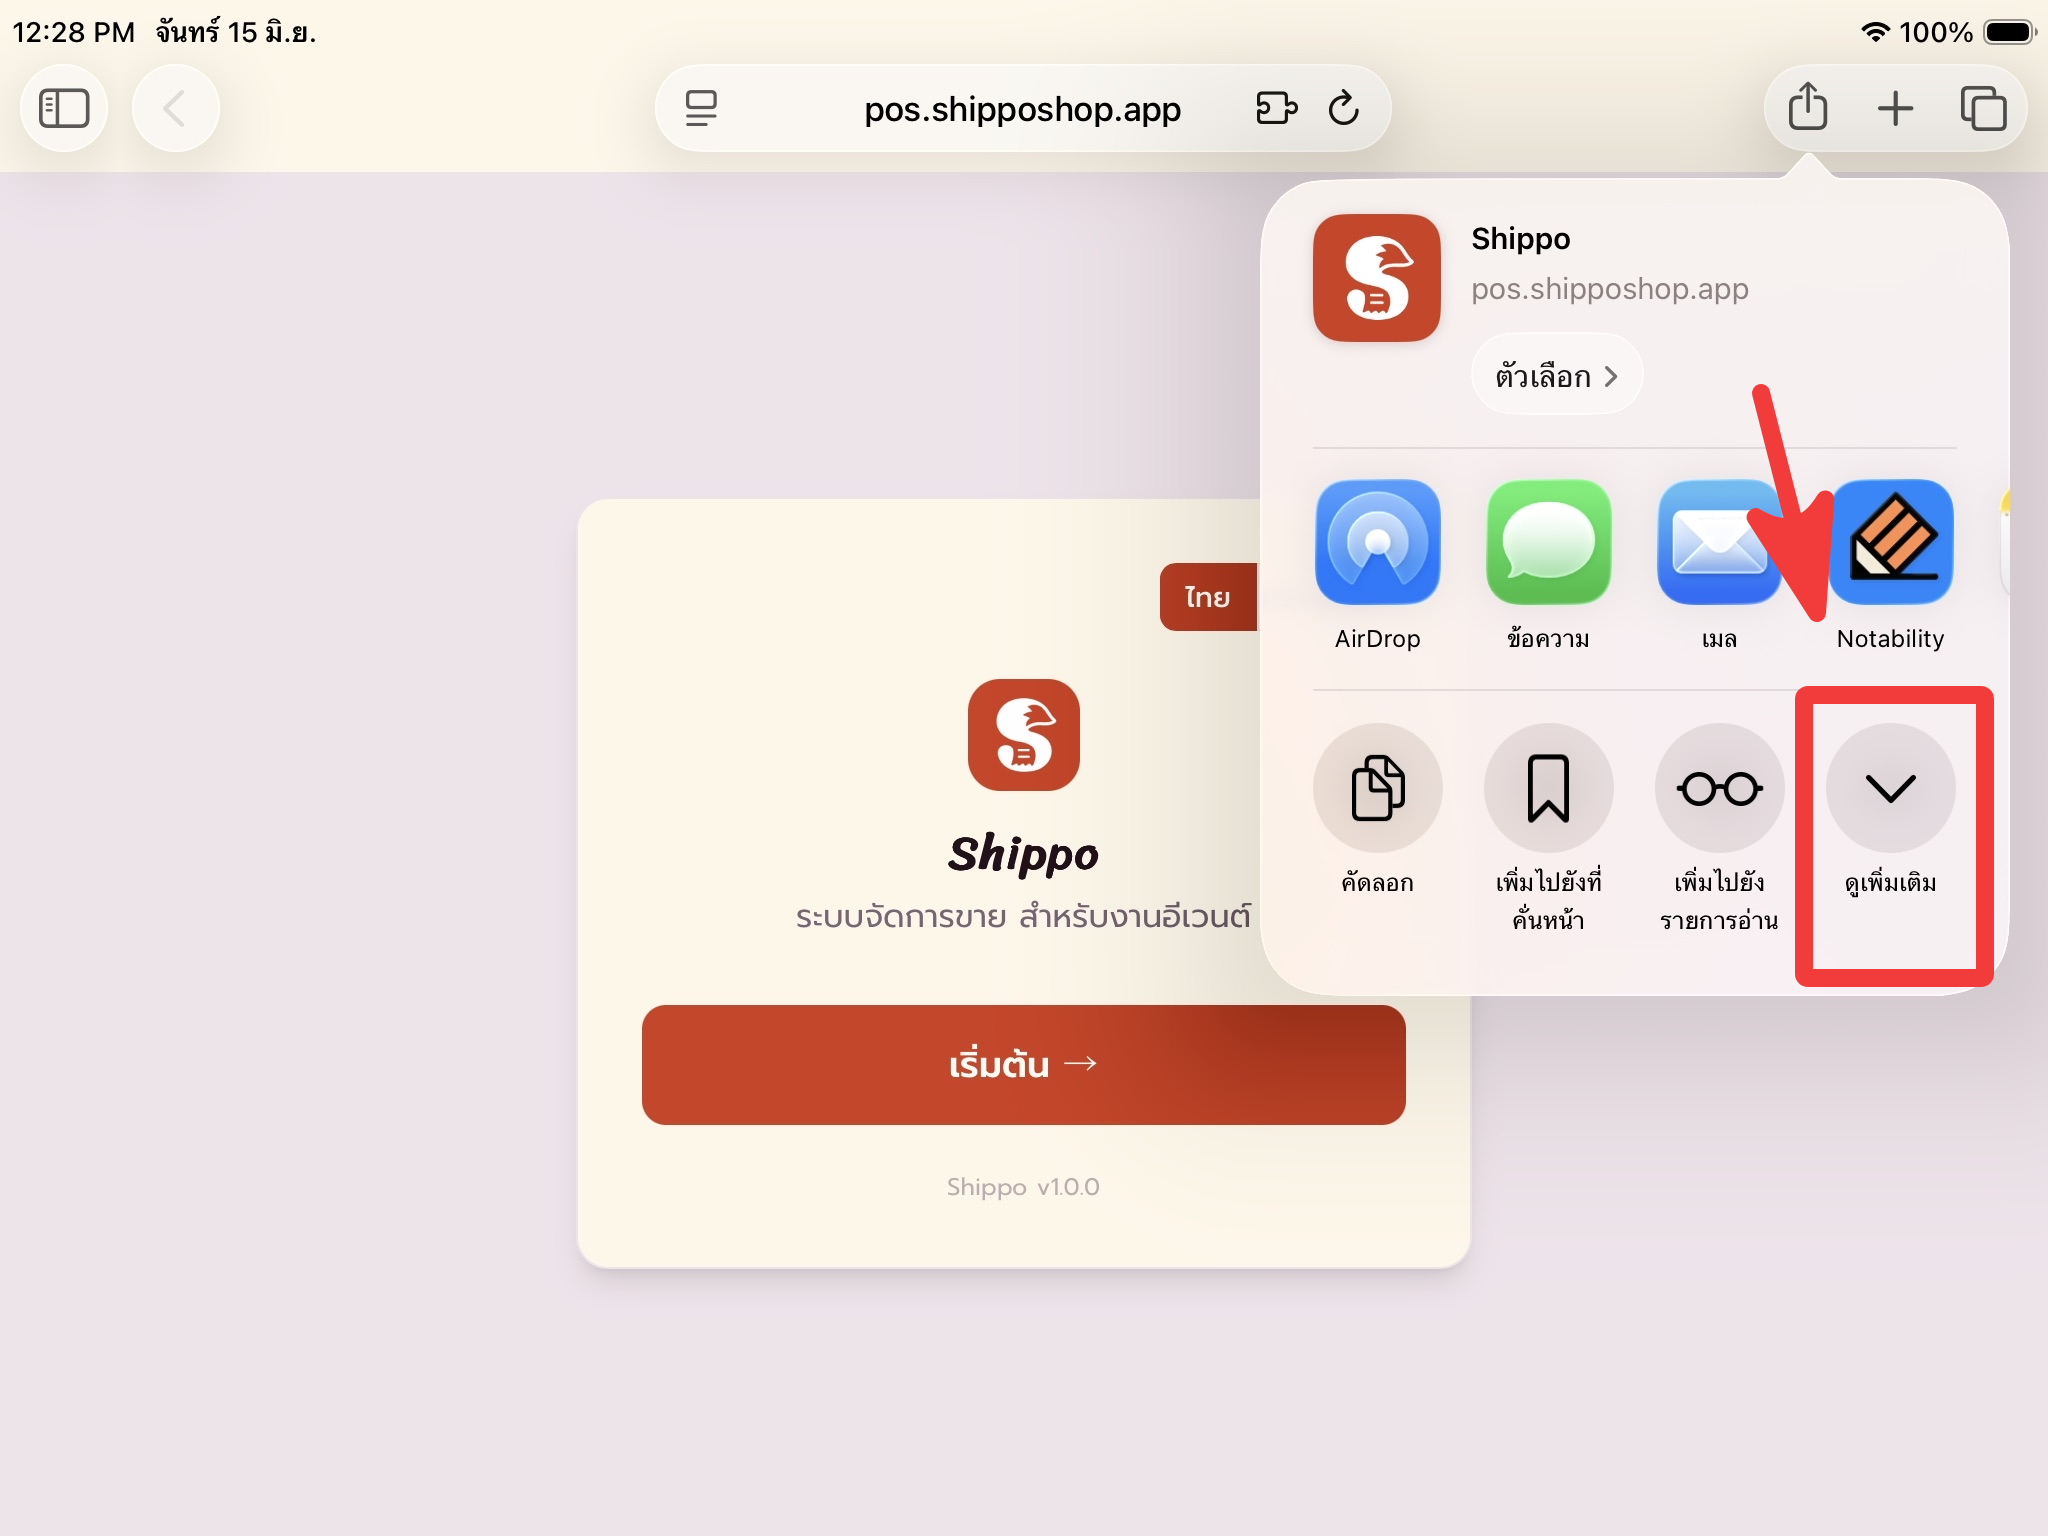
- Safari บน iPhone หรือ iPad: กดปุ่ม “แชร์” แล้วเลือก “เพิ่มไปยังหน้าจอโฮม” เพราะ iOS/iPadOS จะไม่แสดงพรอมป์ติดตั้ง PWA อัตโนมัติ
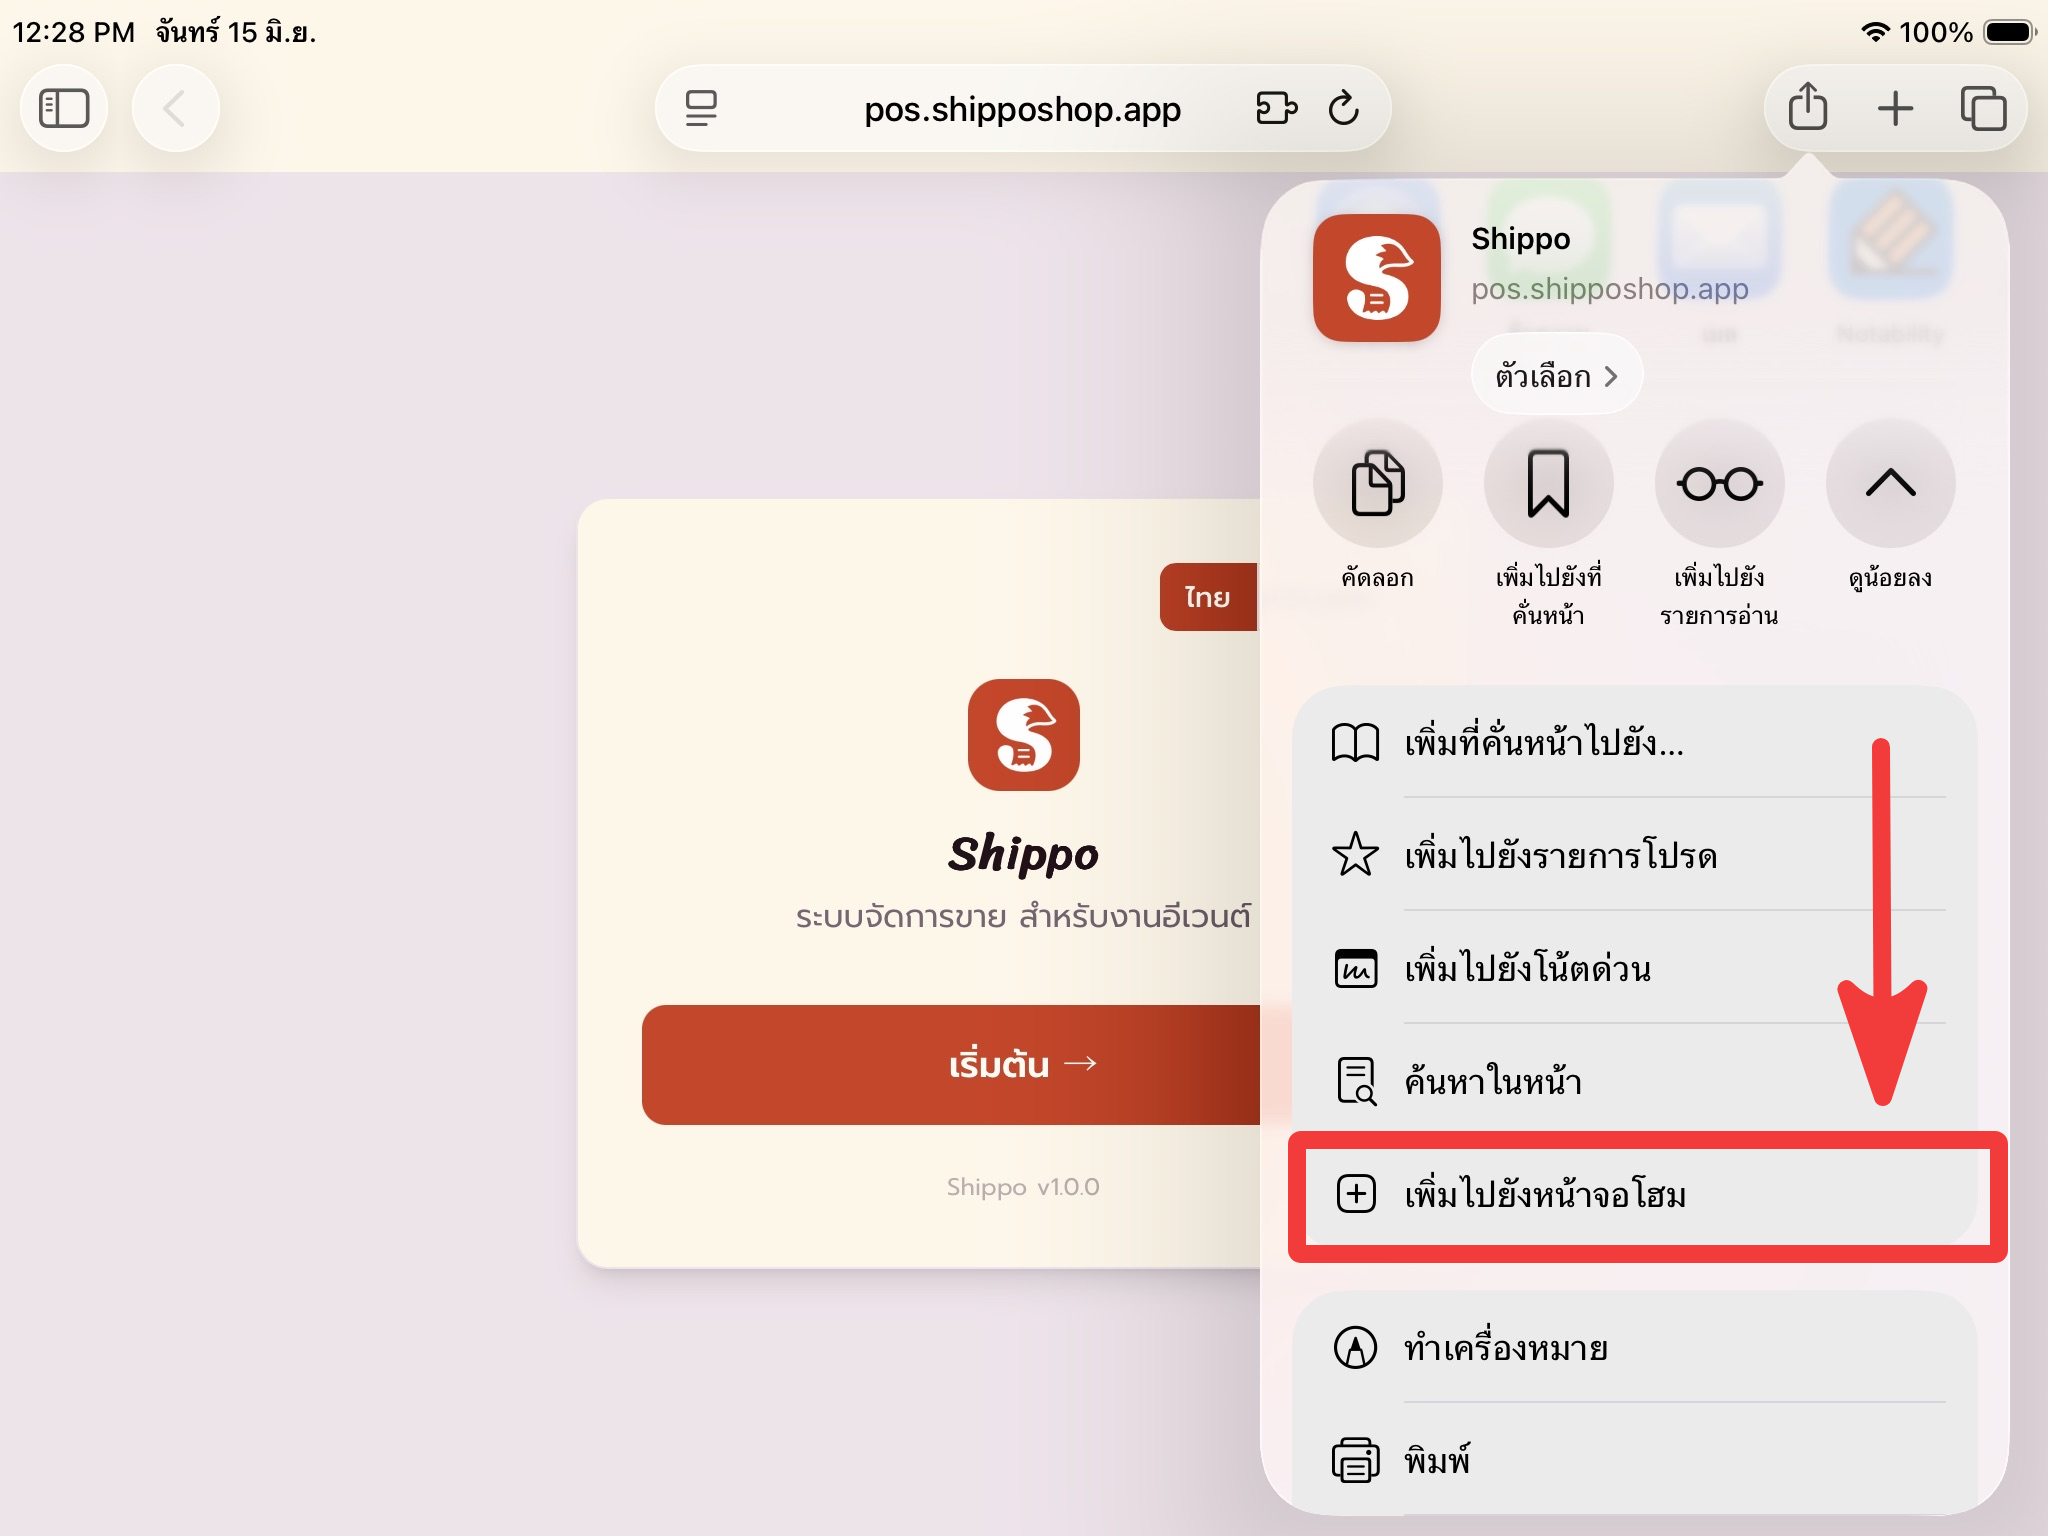
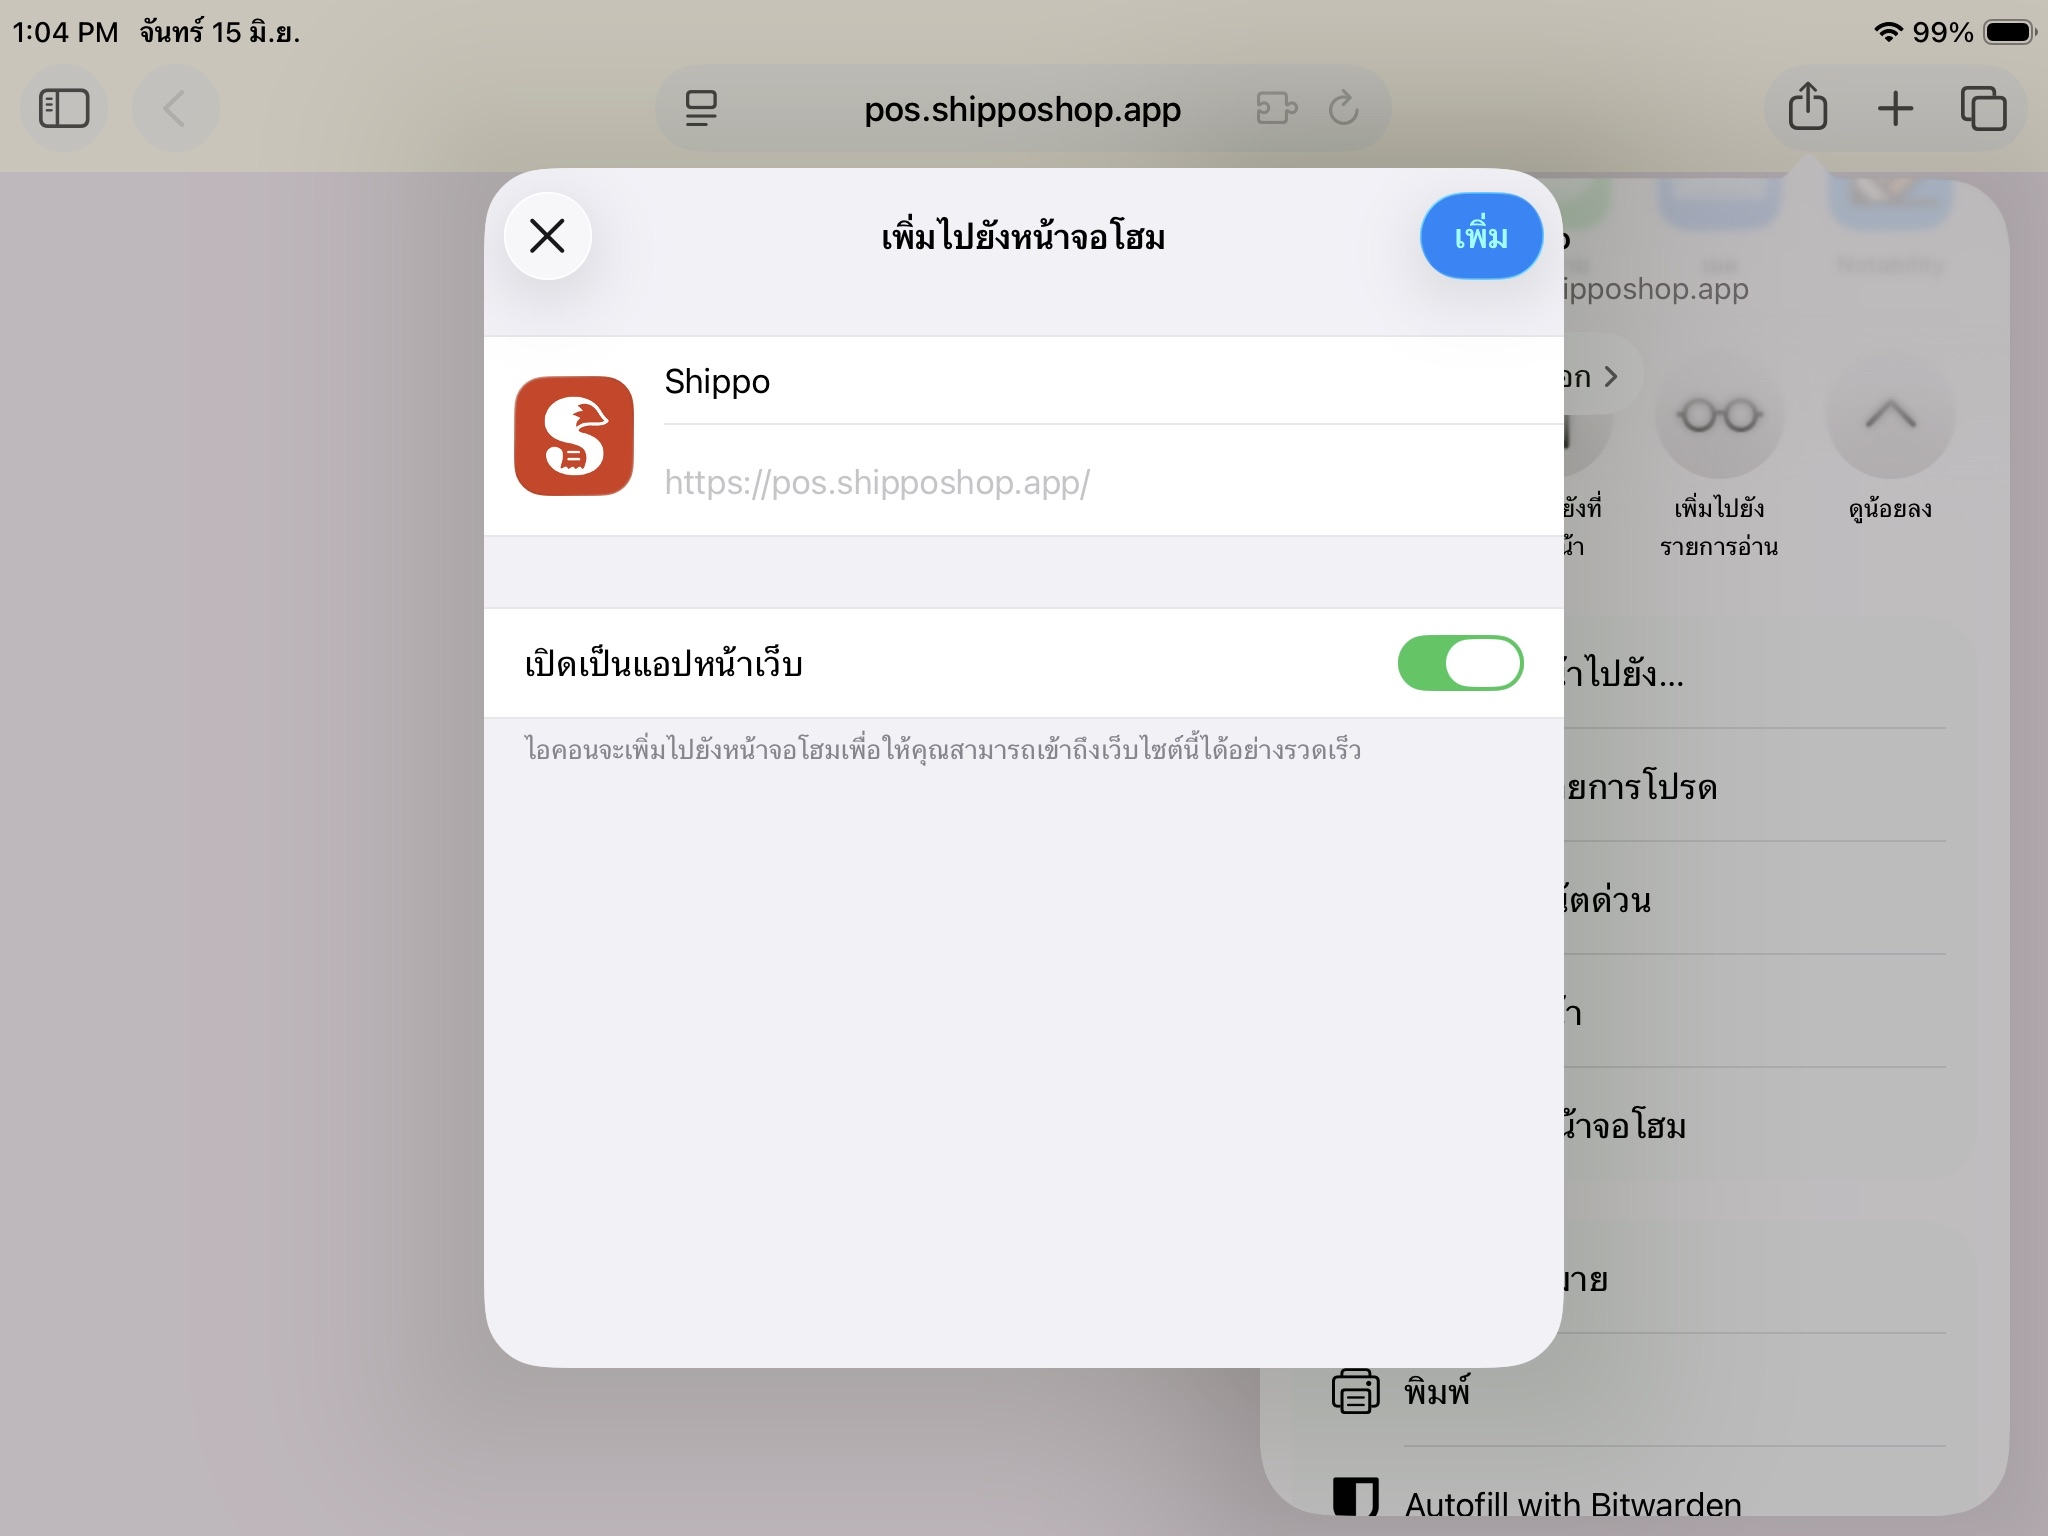
การติดตั้งเหมาะกับเครื่องขายหน้าร้านมาก โดยเฉพาะแท็บเล็ตหรือแล็ปท็อปที่ใช้เป็นจุดขายประจำบูธ พนักงานเปิดได้จากไอคอน ใช้งานเต็มจอ และไม่ต้องหาแท็บ POS ในเบราว์เซอร์ระหว่างงาน
ถ้ามีเวอร์ชันใหม่ Shippo จะแสดงข้อความให้อัปเดต การรีโหลดเพื่ออัปเดตจะไม่ลบข้อมูลในเครื่อง เช่น สินค้า รายการขาย และการตั้งค่า
3. หน้าขาย
แคตตาล็อกสินค้า
หน้า “ขาย” เป็นหน้าหลักของพนักงานขาย แบ่งเป็นแคตตาล็อกสินค้าและตะกร้า ถ้าใช้จอใหญ่ แคตตาล็อกจะอยู่ซ้ายและตะกร้าอยู่ขวา ถ้าใช้มือถือหรือจอแคบ ตะกร้าจะเป็นแผงที่เปิดปิดได้
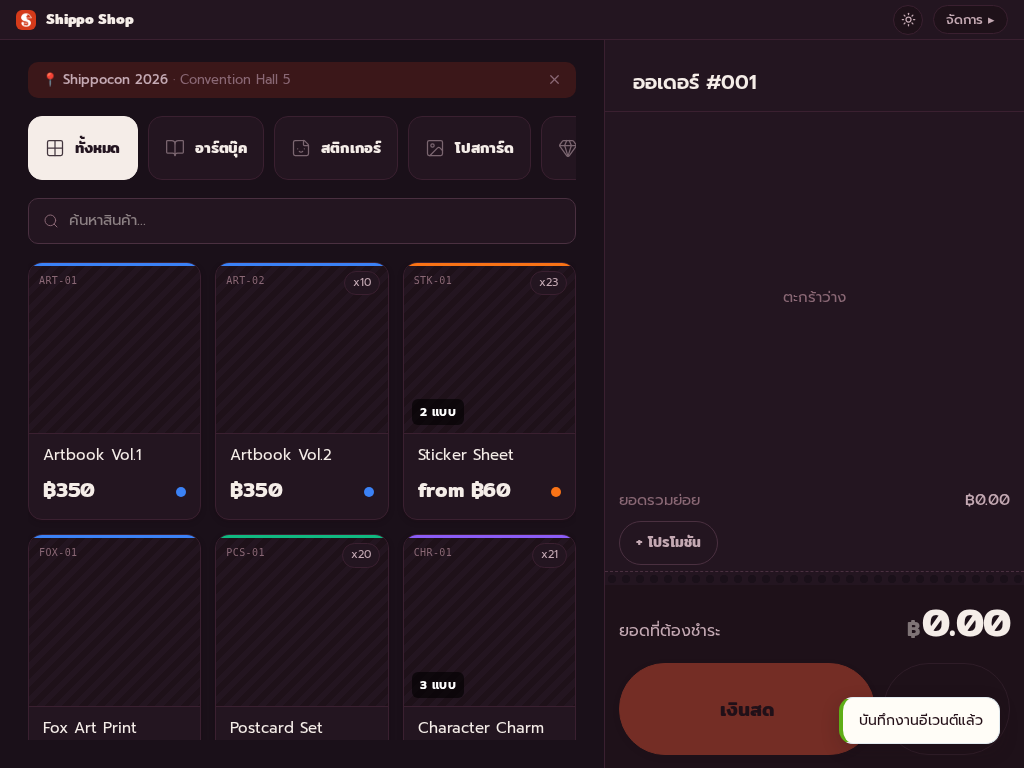
ถ้าเลือกอีเวนต์ไว้ จะมีแถบอีเวนต์ด้านบนพร้อมชื่อและสถานที่ อีเวนต์ที่เลือกมีผลกับโปรโมชันที่ใช้ได้ ถ้ามีมากกว่าหนึ่งอีเวนต์ พนักงานควรเลือกอีเวนต์ให้ถูกก่อนเริ่มขาย
แถบหมวดหมู่ใช้กรองสินค้า มีแท็บ “ทั้งหมด” และแท็บของแต่ละหมวดหมู่ที่ตั้งไว้ใน “จัดการ” > “หมวดหมู่” เปิดช่องค้นหาเพื่อค้นจากชื่อสินค้าหรือ SKU ได้ทันที และปุ่มล้างข้อความจะแสดงเมื่อมีคำค้นหาอยู่
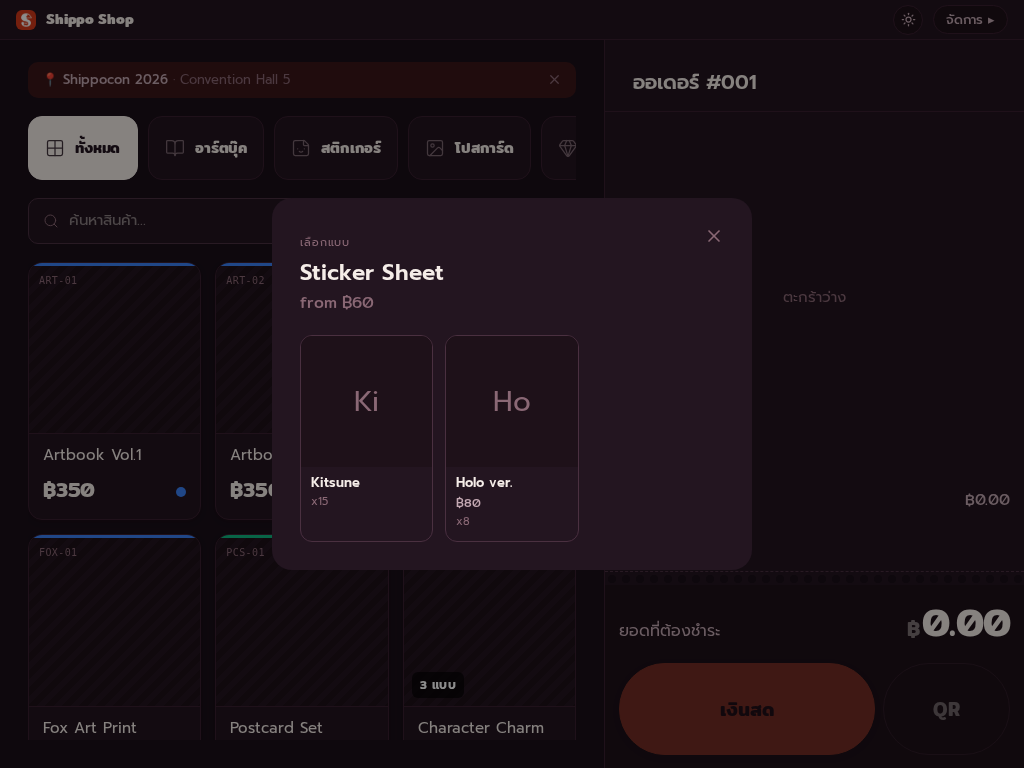
การ์ดสินค้าแสดงรูป ชื่อ ราคา และสถานะสต็อก สินค้าจะแยกเป็นกลุ่มที่ยังมีสต็อกกับสินค้าที่หมดแล้ว สินค้าหมดสต็อกจะจางลงและกดเพิ่มเข้าตะกร้าไม่ได้ ถ้าสินค้ามีตัวเลือกย่อย เช่น ขนาดหรือสี แตะสินค้าแล้วจะมีหน้าต่างให้เลือกตัวเลือกย่อยก่อนเพิ่มลงตะกร้า
ตะกร้า
ตะกร้าแสดงเลขออเดอร์ปัจจุบัน เช่น “#001” และจำนวนตะกร้าที่พักไว้ถ้ามี ปุ่มพักตะกร้าใช้เก็บตะกร้าปัจจุบันไว้ชั่วคราว เพื่อรับลูกค้าคนถัดไปก่อนกลับมาคิดเงินรายการเดิมภายหลัง พักตะกร้าได้สูงสุด 5 ตะกร้า ส่วนปุ่มล้างตะกร้าต้องกดค้างพร้อมนับถอยหลังประมาณ 5 วินาที เพื่อลดโอกาสล้างผิด
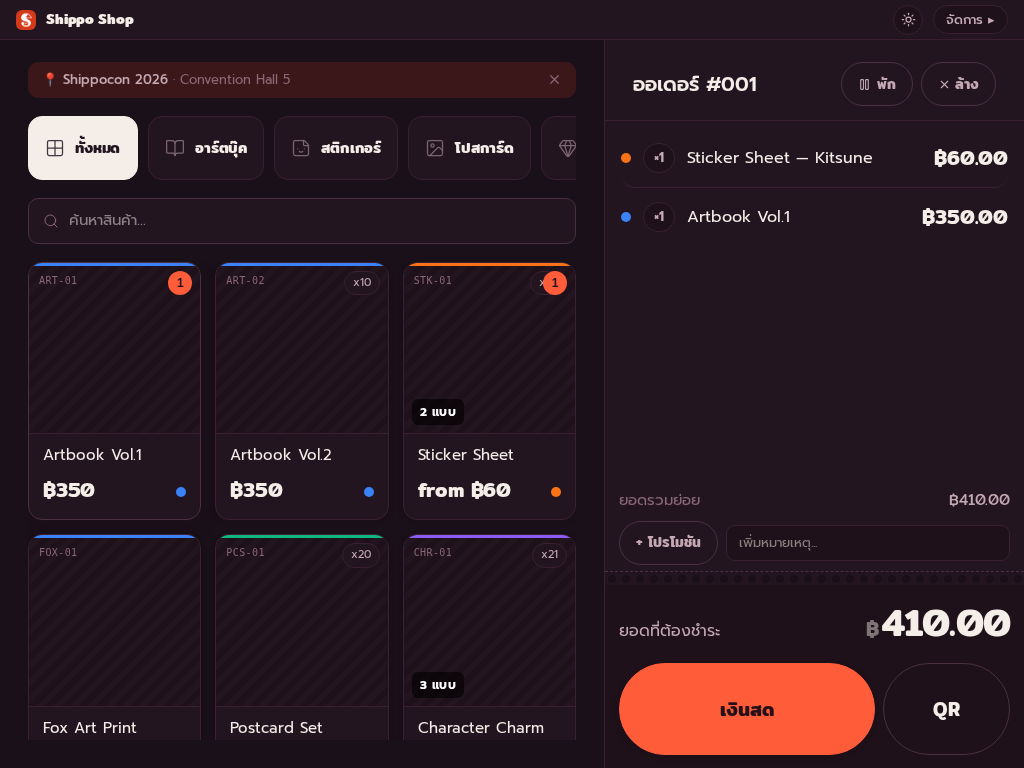
รายการสินค้าในตะกร้าแสดงจุดสีของหมวดหมู่ จำนวน ชื่อสินค้า ชื่อตัวเลือกย่อยถ้ามี และราคารวมต่อแถว แตะรายการเพื่อขยายดูราคาต่อหน่วย สูตรคูณจำนวน และปุ่มเพิ่มหรือลดจำนวน
ส่วนลดใช้กับทั้งออเดอร์ได้ทั้งแบบเปอร์เซ็นต์และจำนวนเงินคงที่ หลังใส่ส่วนลดแล้ว ตะกร้าจะแสดงชนิดและมูลค่าส่วนลดพร้อมปุ่มนำออก ช่องหมายเหตุใช้จดข้อมูลของออเดอร์ เช่น คำขอลูกค้า หรือของที่ฝากไว้ที่เคาน์เตอร์
โปรโมชันที่เข้าเงื่อนไขจะแสดงอัตโนมัติพร้อมยอดประหยัด แต่ละโปรโมชันสามารถกด Restore เพื่อนำโปรโมชันนั้นออกจากออเดอร์นี้ได้ สรุปยอดจะแสดงยอดก่อนลด ส่วนลด ภาษีถ้ามี ยอดรับเงินและเงินทอนตอนจ่ายเงินสด และยอดสุทธิที่ต้องชำระ
ตะกร้าปัจจุบันและตะกร้าที่พักไว้เก็บในความจำเครื่อง จึงยังอยู่หลังการรีโหลดแท็บ แต่มีโอกาสหายถ้าปิดแท็บหรือปิดเบราว์เซอร์ระหว่างขาย
4. ชำระเงินและใบเสร็จ
เงินสด
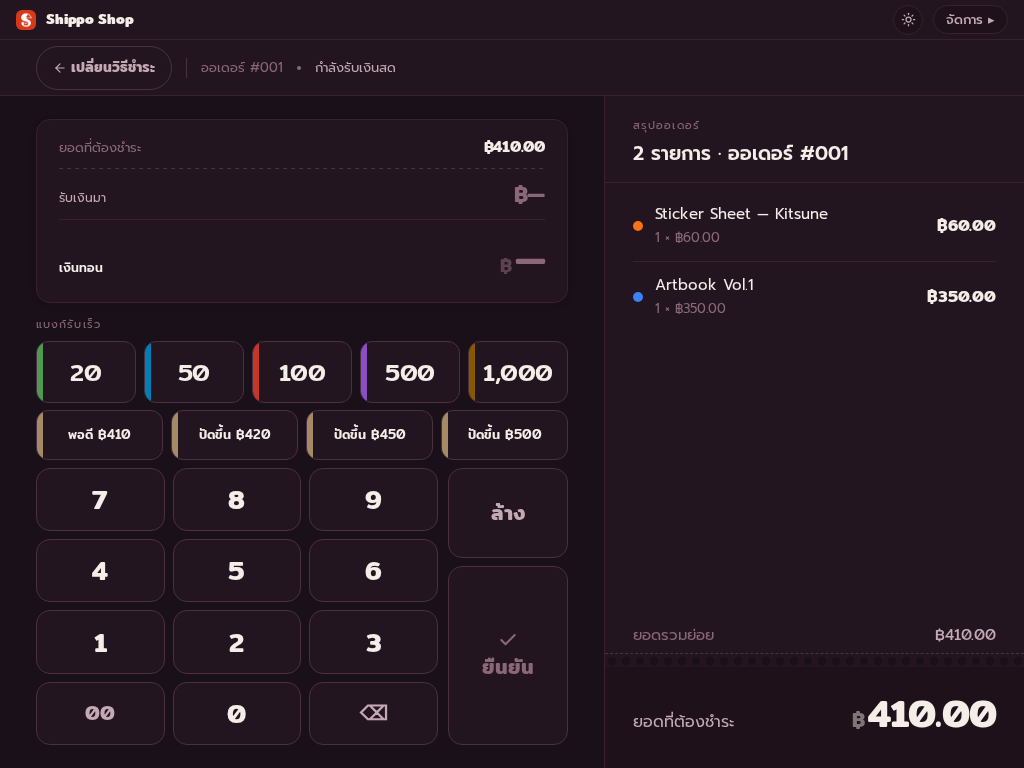
เมื่อกด “ชำระเงิน” แล้วเลือก “เงินสด” Shippo จะแสดงแป้นตัวเลข ปุ่มลบ ปุ่ม “00” และปุ่มล้างทั้งหมด มีปุ่มธนบัตรลัด เช่น 20, 50, 100, 500 และ 1000 บาท เพื่อกรอกยอดรับเงินให้เร็วขึ้น ค่าเหล่านี้ปรับได้ใน “ตั้งค่า”
ยอดเงินที่รับจะแสดงขนาดใหญ่ และเงินทอนจะคำนวณทันทีเมื่อยอดรับเงินเปลี่ยน กด “เสร็จสิ้น” เพื่อบันทึกการขายหลังรับเงินครบแล้ว
QR และ PromptPay
วิธีชำระเงินแบบ “QR แบบรูปภาพ” จะแสดงรูป QR ที่อัปโหลดไว้ ลูกค้าต้องกรอกยอดเงินเองในแอปธนาคาร พนักงานกด “เสร็จสิ้น” หลังตรวจสอบว่าชำระแล้ว
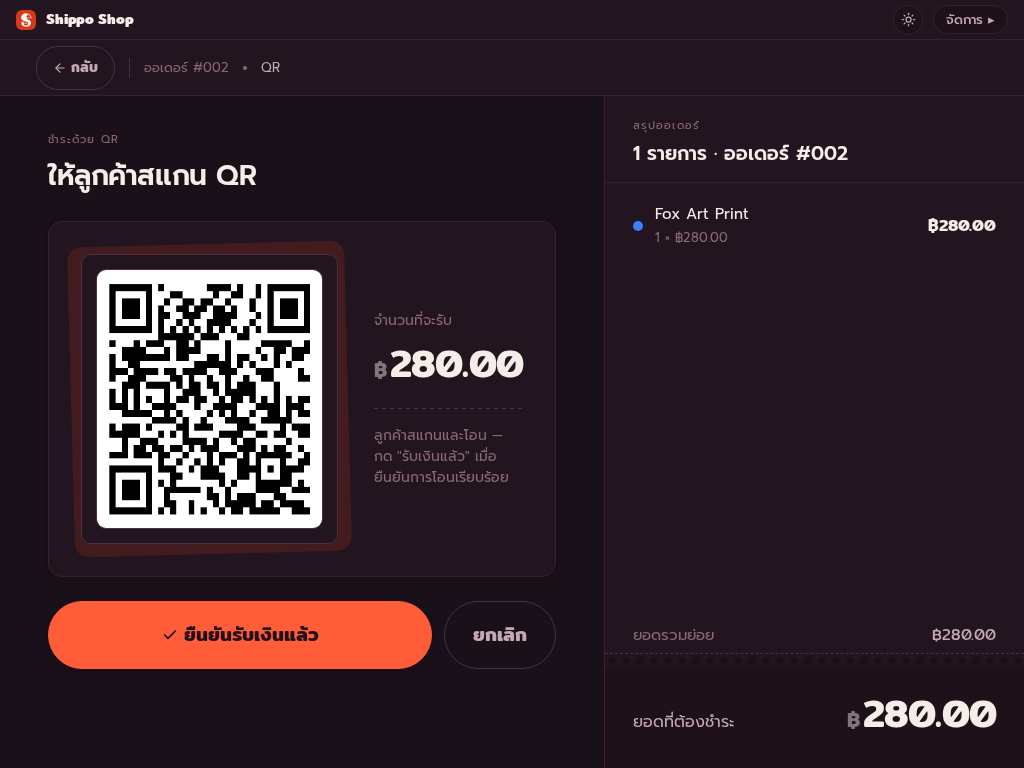
วิธีชำระเงินแบบ “QR พร้อมเพย์แบบกรอกเลข” จะสร้าง QR ตามยอดสุทธิของออเดอร์ ถ้าในตะกร้ามีสินค้าจากหลายศิลปิน และศิลปินเหล่านั้นมีเลขพร้อมเพย์ Shippo จะแสดงตัวเลือกศิลปินก่อนสร้าง QR ระหว่างสร้าง QR จะมีสถานะกำกับ และถ้าสร้างไม่สำเร็จจะแสดงข้อความผิดพลาด
วิธีชำระเงินอื่น
วิธีชำระเงินประเภท “เครื่องรูดบัตร” หรือ “อื่น ๆ” จะแสดงหน้าจอยืนยันแบบเรียบง่ายพร้อมปุ่ม “เสร็จสิ้น” ตอนนี้ยังไม่มีการเชื่อมต่อกับผู้ให้บริการชำระเงินจริง
ใบเสร็จ
หลังชำระเงินสำเร็จ Shippo จะแสดงใบเสร็จที่มีเลขออเดอร์ เวลา รายการสินค้า จำนวน ราคาต่อหน่วย ยอดรวมต่อรายการ ส่วนลด โปรโมชัน ภาษี วิธีชำระเงิน ยอดรับและเงินทอนกรณีเงินสด และยอดสุทธิ
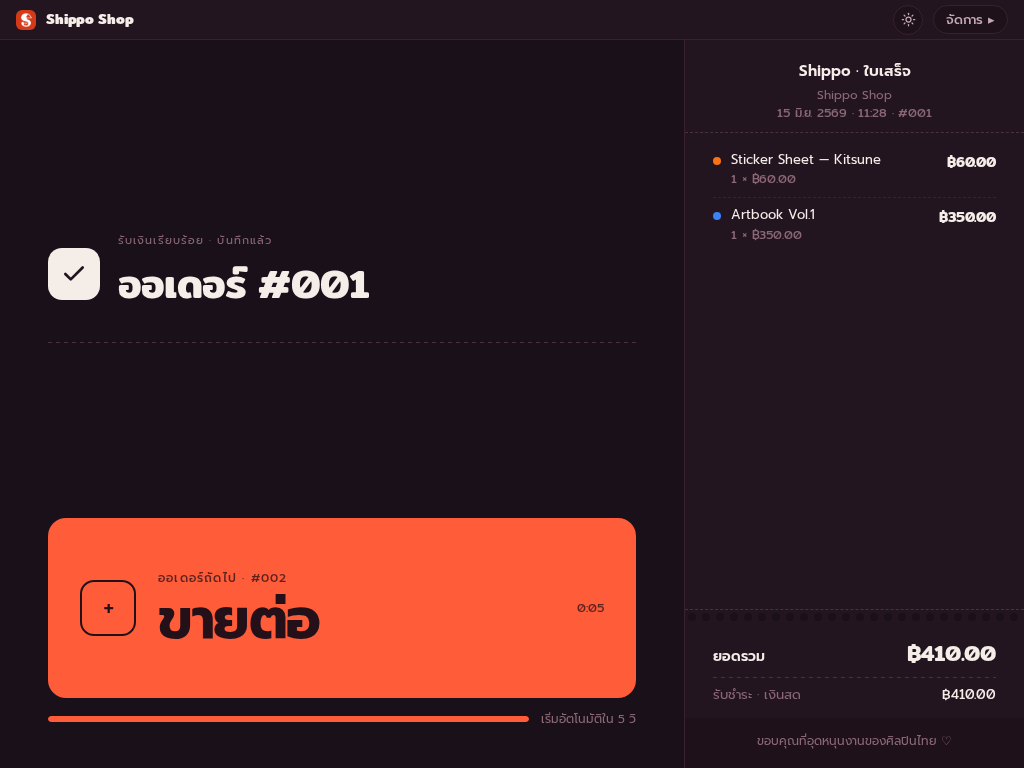
ใบเสร็จจะกลับไปหน้า “ขาย” อัตโนมัติหลังเวลาที่ตั้งไว้ ค่าเริ่มต้นคือ 5 วินาที และปรับได้ 0-60 วินาที ถ้าตั้งเป็น 0 แอปจะไม่กลับอัตโนมัติ คนขายต้องปิดหน้าจอใบเสร็จเองหลังการขาย ถ้าสินค้าบางรายการเหลือน้อยกว่าหรือเท่ากับเกณฑ์แจ้งเตือน แอปจะแสดงเตือนสต็อกต่ำให้
5. จัดการแคตตาล็อกและอีเวนต์
หน้าจัดการ
โหมด “จัดการ” เหมาะสำหรับเจ้าของร้านหรือผู้ดูแลงาน แถบด้านข้างมีเมนู “ศิลปิน”, “หมวดหมู่”, “สินค้า”, “งานอีเวนต์”, “โปรโมชัน”, “รายการขาย” และ “ตั้งค่า” ปุ่ม “ขาย” ในหัวหน้าจอใช้กลับไปหน้าขาย
ศิลปิน
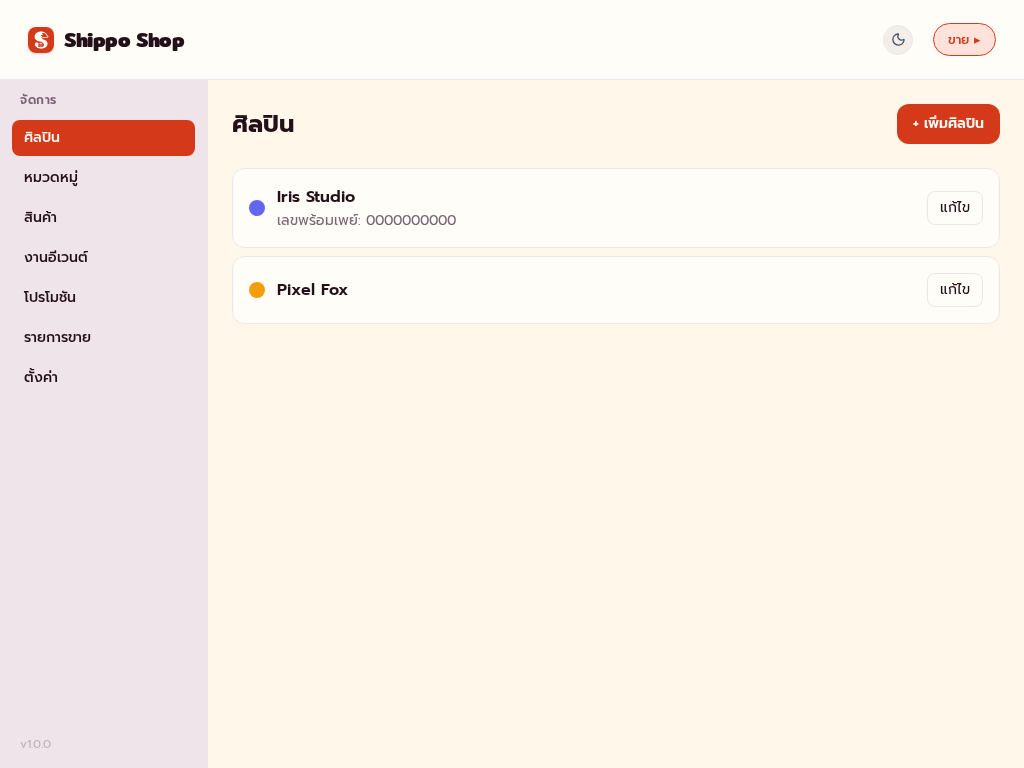
“ศิลปิน” ใช้แยกเจ้าของสินค้า รายงานยอดขาย และการรับเงินผ่าน QR พร้อมเพย์ รายชื่อจะแสดงทั้งศิลปินที่ใช้งานและไม่ใช้งาน โดยศิลปินที่ไม่ใช้งานในระบบจะมีสถานะกำกับไว้
ข้อมูลที่กรอกได้คือชื่อ สีประจำศิลปิน และ “เลขพร้อมเพย์” ถ้ามีเลขพร้อมเพย์ ศิลปินคนนั้นจะรับเงินผ่าน QR พร้อมเพย์ได้ เมื่อศิลปินมีสินค้าหรือประวัติธุรกรรมอยู่ การ “เก็บถาวร” จะปิดการใช้งานแทนการลบถาวร เพื่อไม่ให้ประวัติเดิมเสียไปจากแอป
หมวดหมู่
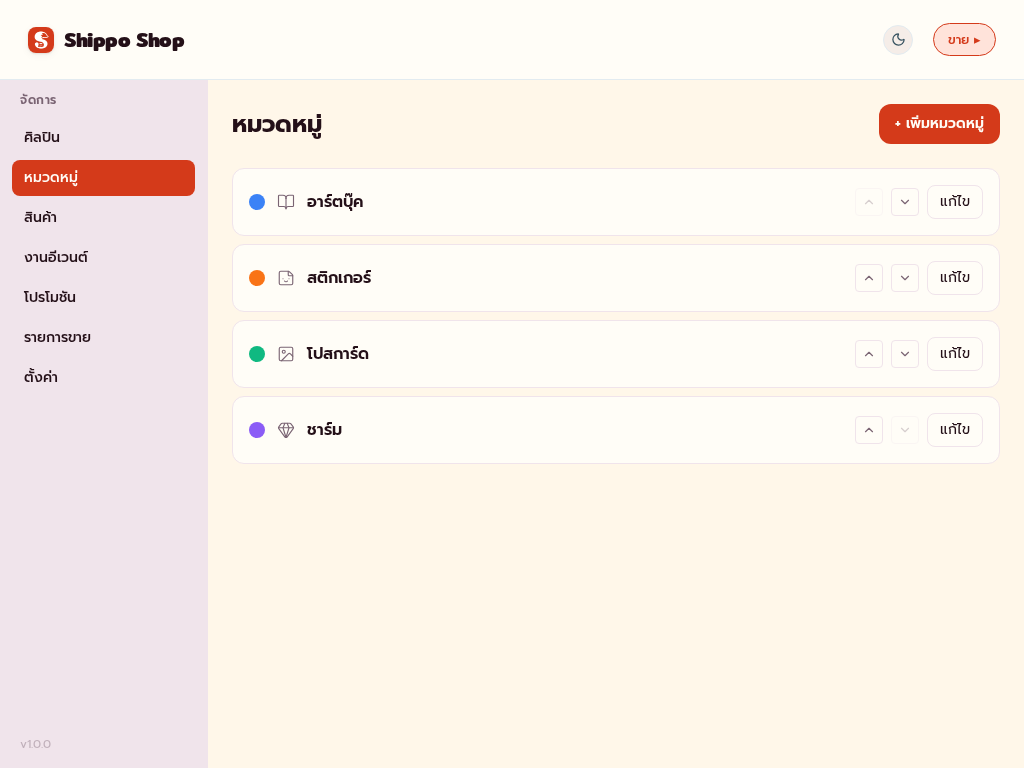
“หมวดหมู่” ใช้จัดกลุ่มสินค้าในหน้า “ขาย” แต่ละหมวดหมู่มีชื่อ ไอคอน และสี สีนี้จะแสดงบนการ์ดสินค้าและรายการในตะกร้า ลำดับหมวดหมู่มีผลกับลำดับแท็บในหน้า “ขาย”
ถ้าลบหมวดหมู่ สินค้าที่เคยใช้หมวดหมู่นั้นจะไม่ถูกลบ แต่จะทำให้สินค้านั้นไม่มีกลุ่ม สี หรือไอคอนหมวดหมู่ให้แสดงในแคตตาล็อก
สินค้าและตัวเลือกย่อย
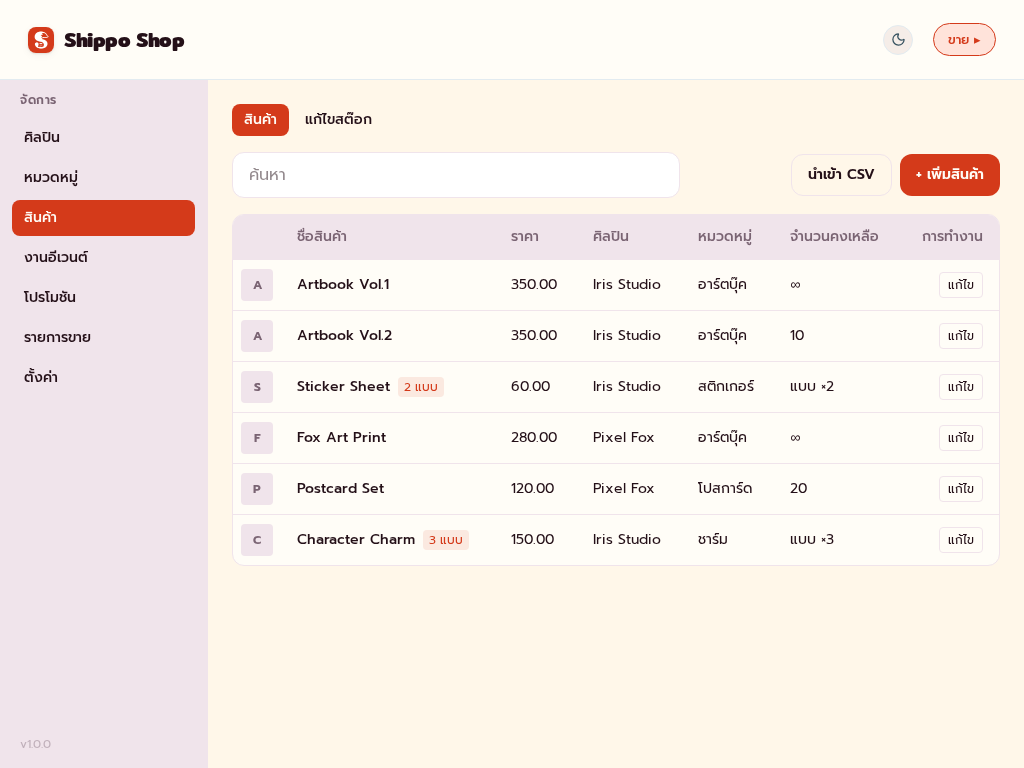
“สินค้า” แสดงสินค้าที่ยังไม่ถูก “เก็บถาวร” และค้นหาได้ด้วยชื่อหรือ SKU ฟอร์มสินค้ามีชื่อ ราคา ศิลปิน หมวดหมู่ สต็อก SKU หมายเหตุ แท็ก และรูปสินค้า รูปที่อัปโหลดจะถูกบีบอัดอัตโนมัติ
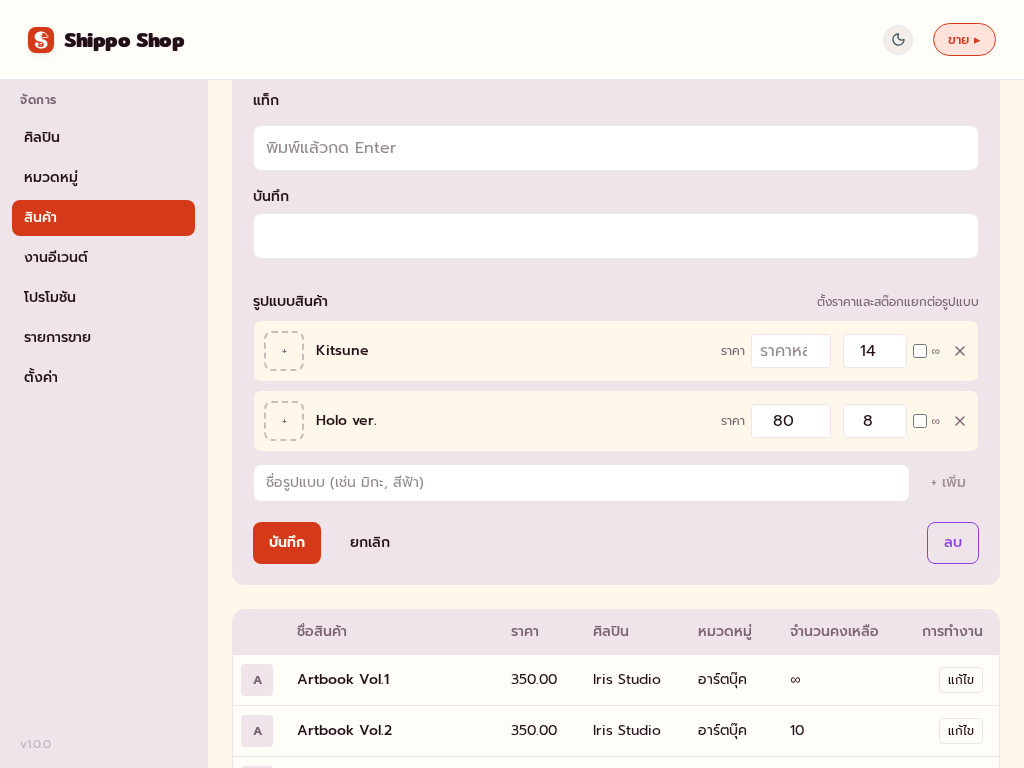
ถ้าสินค้าไม่ต้องนับสต็อก ให้ตั้งเป็น “ไม่จำกัด” สินค้าประเภทนี้จะไม่หมดสต็อกจากการขาย ถ้าสินค้ามีหลายแบบ เช่น ขนาด สี หรือชุดราคา ให้เพิ่มเป็น “รูปแบบสินค้า” แต่ละรูปแบบมีชื่อ ราคา รูป และสต็อกของตัวเอง ตอนขายสินค้าที่มีรูปแบบสินค้า แอปจะให้เลือกรูปแบบก่อนเพิ่มลงตะกร้า
การ “เก็บถาวร” จะซ่อนสินค้าจากหน้า “ขาย” และรายการสินค้า แต่ยังเก็บประวัติธุรกรรมเดิมไว้ ถ้าต้องการยกเลิกการเก็บถาวร วิธีคืนข้อมูลในตอนนี้คือกู้จากไฟล์สำรองหรือสร้างสินค้าใหม่
ปรับสต็อกและนำเข้า CSV
“แก้ไขสต๊อก” ใช้ปรับสต็อกสินค้าหรือรูปแบบสินค้าหลายรายการพร้อมกัน มีค้นหา กรอง และปรับจำนวนเป็นชุด เหมาะกับการเตรียมของก่อนเปิดบูธหรือเติมสต็อกระหว่างวัน
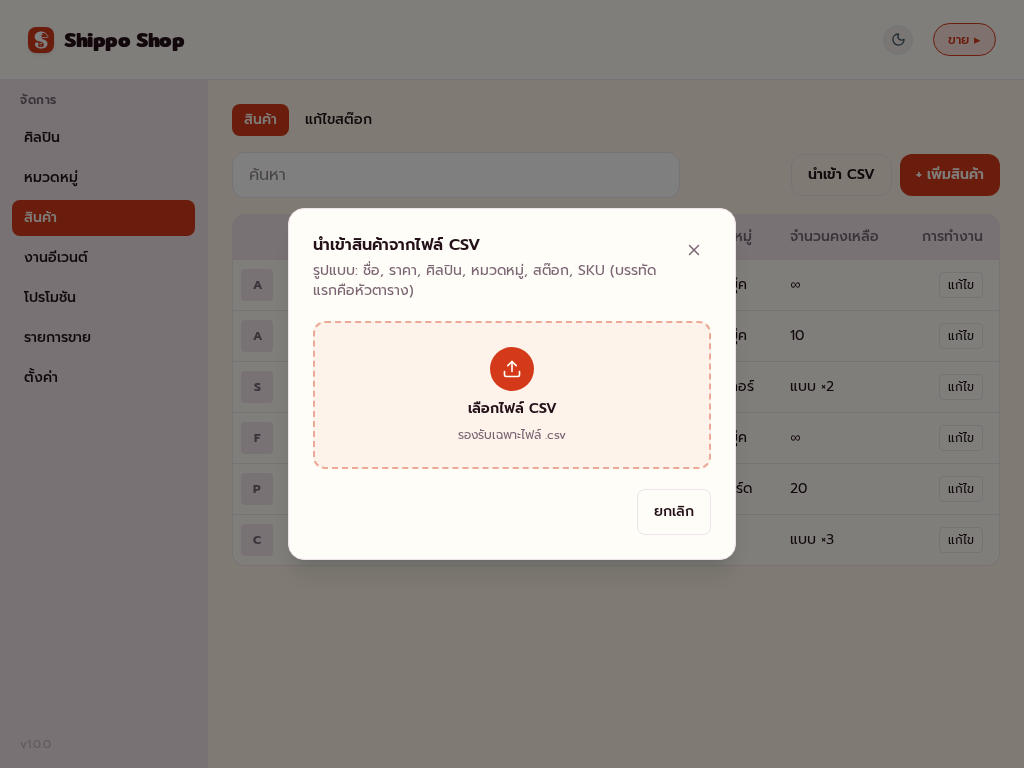
“นำเข้า CSV” รับไฟล์ .csv ที่มีหัวตาราง คอลัมน์ที่รองรับคือ ชื่อ, ราคา, ศิลปิน, หมวดหมู่, สต๊อก และ SKU แอปจะตรวจทีละแถว แสดงข้อผิดพลาดเป็นรายแถว และสร้างศิลปินหรือหมวดหมู่ใหม่ให้อัตโนมัติถ้ายังไม่มี
โปรโมชัน
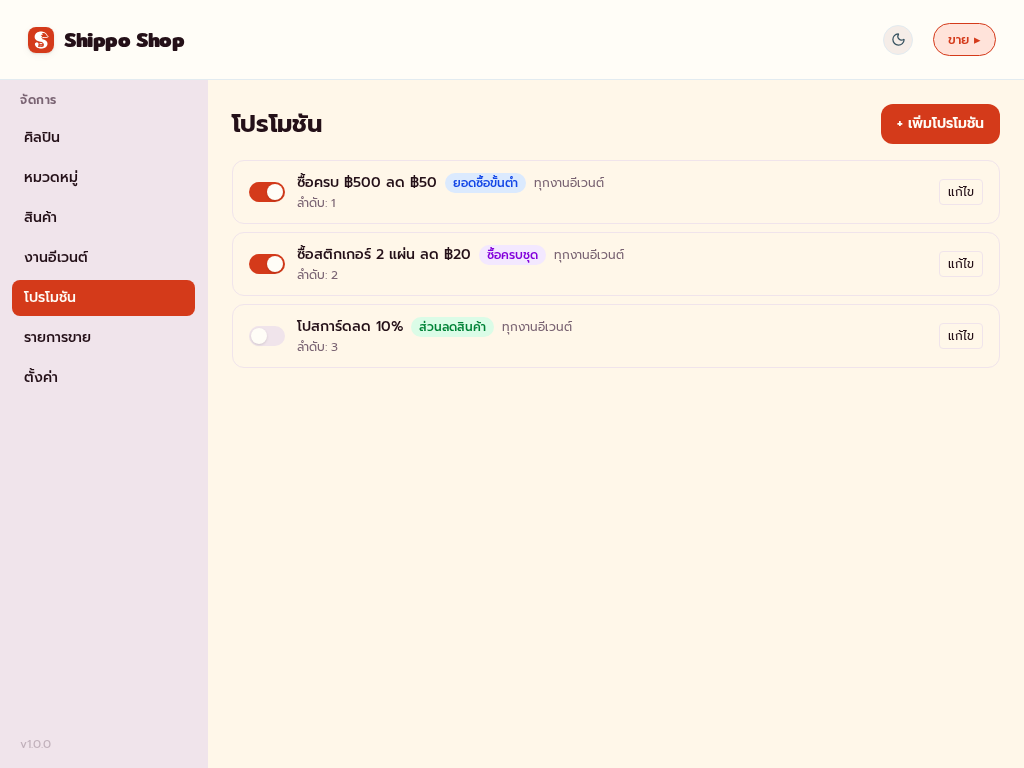
“โปรโมชัน” ใช้สร้างส่วนลดอัตโนมัติ สามารถเปิดปิด ค้นหา และกรองตามอีเวนต์หรือสถานะได้ โปรโมชันมี 3 แบบ:
- ยอดซื้อขั้นต่ำ: เมื่อลูกค้าซื้อถึงยอดที่กำหนด จะได้ส่วนลดเป็นเปอร์เซ็นต์หรือจำนวนเงิน
- ซื้อครบชุด: เมื่อซื้อสินค้าหรือรูปแบบสินค้าที่กำหนดครบจำนวน สินค้าเป้าหมายจะได้ส่วนลด
- ส่วนลดสินค้า: สินค้าหรือรูปแบบสินค้าที่กำหนดจะได้ส่วนลดต่อชิ้น เมื่อซื้อถึงจำนวนขั้นต่ำ
โปรโมชันตั้งได้ทั้งแบบใช้ได้ทุกอีเวนต์ หรือผูกกับอีเวนต์ใดอีเวนต์หนึ่ง ถ้าผูกกับอีเวนต์ โปรโมชันจะใช้ได้เฉพาะตอนเลือกอีเวนต์นั้นในหน้า “ขาย” แต่ละขอบเขตเปิดโปรโมชันพร้อมกันได้สูงสุด 10 รายการ ถ้าพยายามเปิดรายการที่ 11 ในขอบเขตเดียวกัน แอปจะบล็อกไว้
อีเวนต์และสรุป
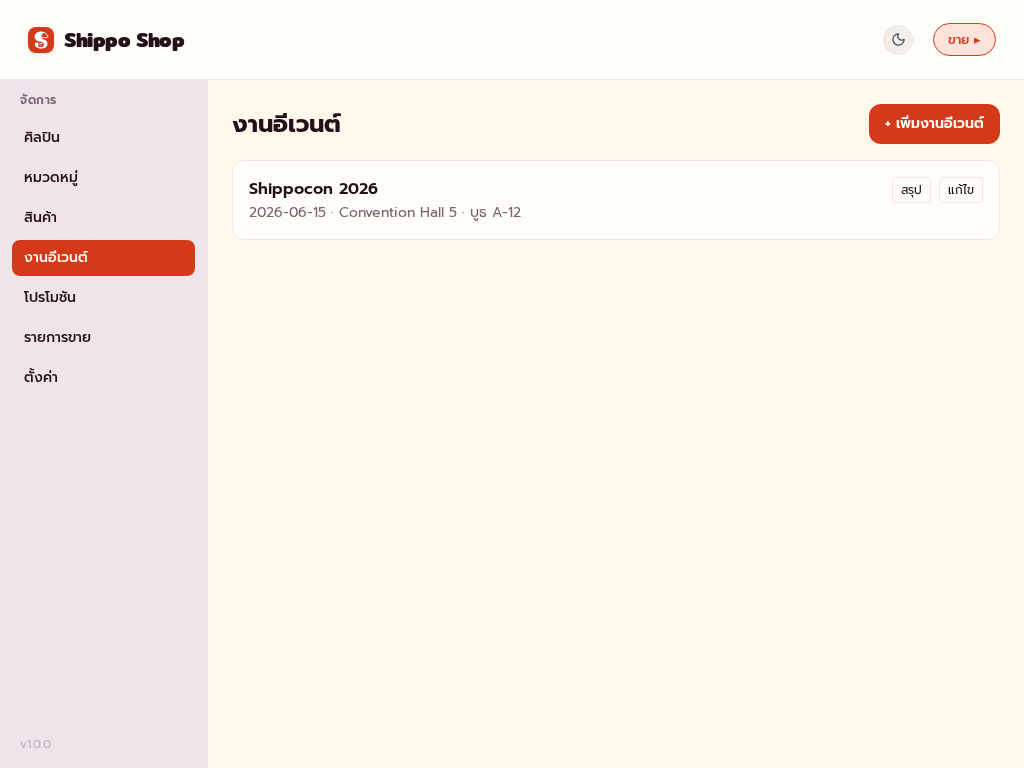
“งานอีเวนต์” ใช้ติดตามยอดขายตามงานหรือรอบขาย ฟอร์มอีเวนต์มีชื่อ วันเวลาเริ่มต้น วันเวลาสิ้นสุด สถานที่ และคำอธิบาย อีเวนต์ที่จบแล้วสามารถ “เก็บถาวร” เพื่อเก็บเป็นประวัติ และใช้เทียบยอดขายกับงานอื่นในอนาคต
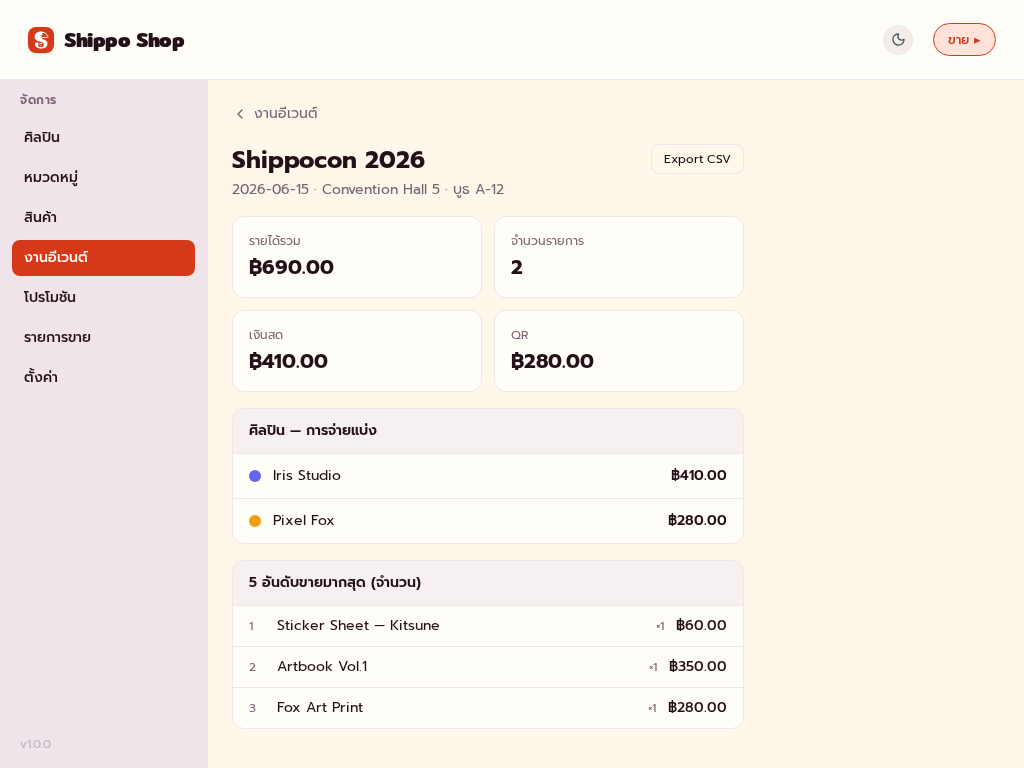
“สรุป” แสดงตัวเลขของอีเวนต์ เช่น รายได้รวม จำนวนสินค้า จำนวนออเดอร์ และส่วนลด รวมถึงรายการธุรกรรม กราฟเทียบยอดขายกับอีเวนต์เก่าที่เก็บถาวรไว้ ยอดแยกตามศิลปิน หมวดหมู่ และแท็ก
6. รายการขาย รายงาน และการตั้งค่า
รายการขาย
“รายการขาย” อยู่ใน “จัดการ” > “รายการขาย” และมีทั้งโหมดรายการขายกับรายงาน โหมดรายการขายแสดงรายการขายแบบแบ่งหน้า กรองเป็น “วันนี้” หรือ “ทั้งหมด” ได้ แต่ละแถวมีเลขออเดอร์ เวลา ยอดรวม วิธีชำระเงิน จำนวนสินค้า และปุ่มดูรายละเอียด
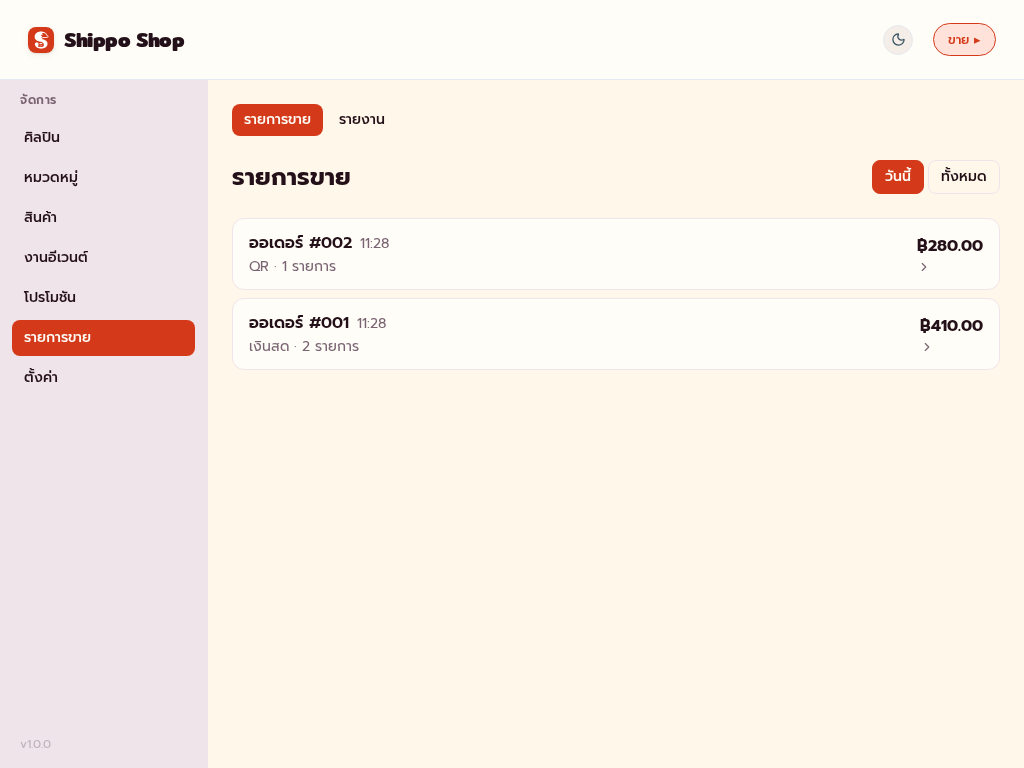
รายละเอียดรายการขายแสดงรายการสินค้า ส่วนลด ภาษี ยอดรวม วิธีชำระเงิน ยอดรับและเงินทอนกรณีเงินสด โปรโมชัน และหมายเหตุ ถ้าต้องยกเลิกรายการ ให้ใช้ “ยกเลิกรายการ” แทนการลบ การยกเลิกจะเก็บประวัติไว้ คืนสต็อกให้สินค้าที่ขายไป และไม่นับยอดนั้นในรายงานรายได้
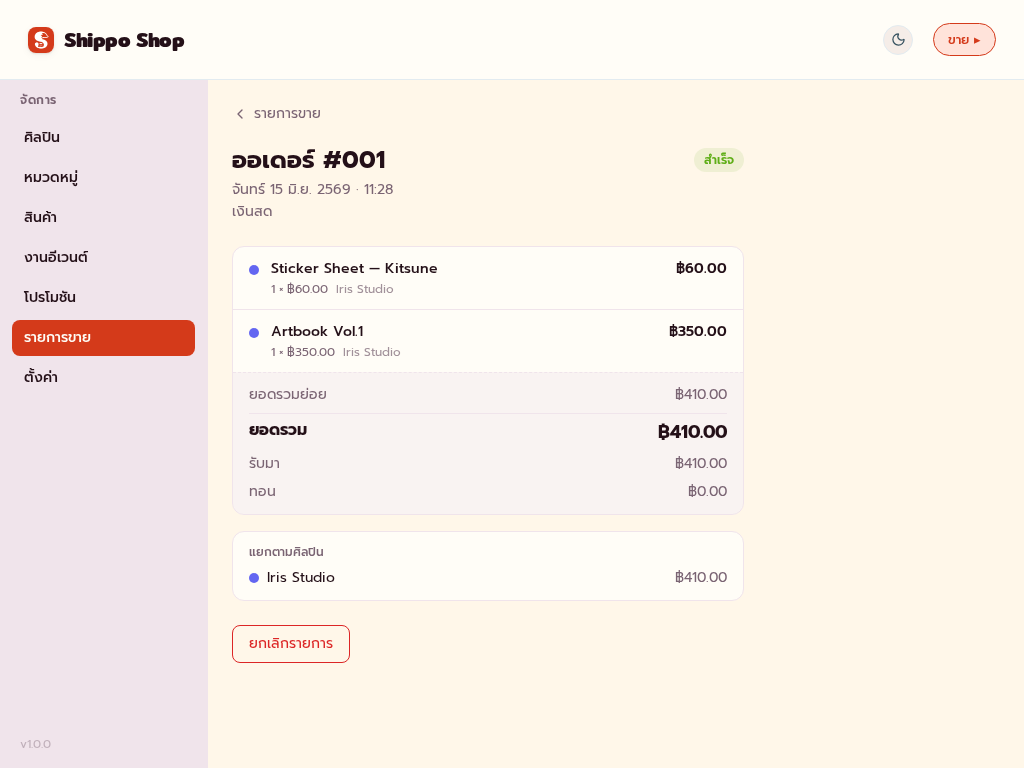
“คืนสถานะรายการ” ใช้ย้อนกลับการยกเลิก โดยหักสต็อกอีกครั้ง ถ้าสต็อกปัจจุบันไม่พอ Shippo จะบล็อกและแจ้งเตือนจนกว่าจะปรับสต็อกให้เพียงพอ
รายงาน
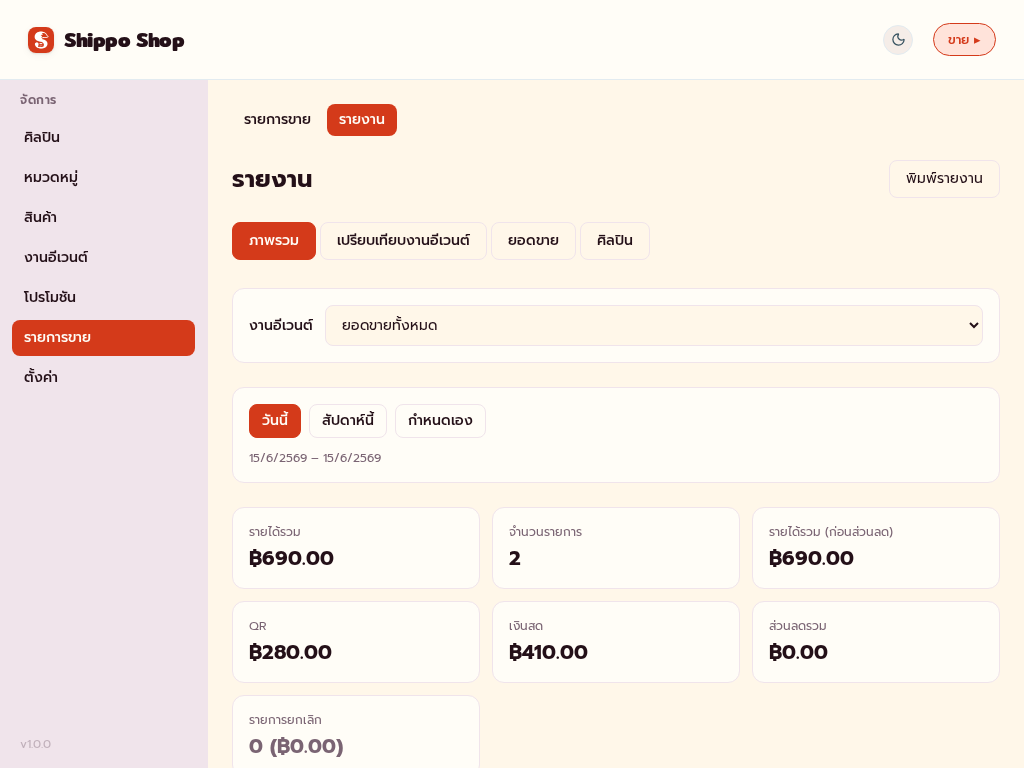
โหมด “รายงาน” มี 4 แท็บย่อย ได้แก่ “ภาพรวม”, “เปรียบเทียบงานอีเวนต์”, “ยอดขาย” และ “ศิลปิน” ใช้ “ภาพรวม” เพื่อดูตัวเลขประจำวัน ใช้ “เปรียบเทียบงานอีเวนต์” เพื่อเทียบหลายอีเวนต์ ใช้ “ยอดขาย” เพื่อดูว่าสินค้าขยับดีแค่ไหน และใช้ “ศิลปิน” เพื่อดูผลงานของศิลปินหรือผู้ขาย
ใน “ภาพรวม” เลือกช่วงวันที่เป็น “วันนี้”, “สัปดาห์นี้” หรือ “กำหนดเอง” ได้ และกรองตามอีเวนต์ได้ด้วย โดยจะแสดงรายได้รวม ภาษีที่เก็บ จำนวนสินค้า จำนวนออเดอร์ มูลค่าเฉลี่ยต่อออเดอร์ และส่วนลดรวม หน้านี้ยังมีกราฟยอดขายรายชั่วโมง และยอดขายแยกตามศิลปิน หมวดหมู่ หรือแท็ก
“เปรียบเทียบงานอีเวนต์” ใช้ดูสถิติหลายอีเวนต์เทียบกัน เช่น รายได้ จำนวนสินค้า และจำนวนออเดอร์ “ยอดขาย” ใช้ดูว่าสินค้าไหนขายดีหรือขายช้า “ศิลปิน” แสดงรายได้ จำนวนสินค้าที่ขาย ส่วนลดที่เกี่ยวข้อง และตัวเลขสำหรับคำนวณค่าคอมมิชชัน
การตั้งค่า
“ตั้งค่า” ใช้จัดการข้อมูลร้าน วิธีชำระเงิน ไฟล์สำรอง พื้นที่จัดเก็บ และคำสั่งขั้นสูง
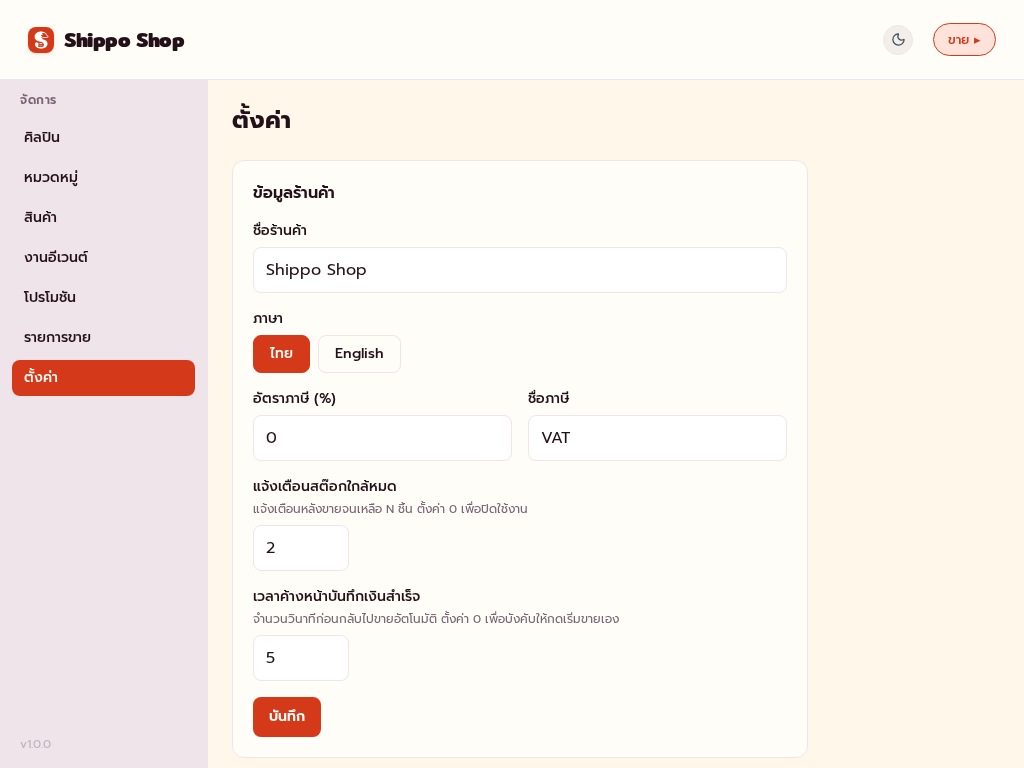
“ข้อมูลร้านค้า” มีชื่อร้าน ภาษา สกุลเงิน อัตราภาษี ชื่อภาษี เกณฑ์แจ้งเตือนสต็อกต่ำ และเวลาที่ดันหน้าใบเสร็จกลับหน้าขายอัตโนมัติ ตั้งเวลาได้ 0-60 วินาที ถ้าตั้งเป็น 0 แอปจะไม่กลับอัตโนมัติ
“วิธีชำระเงิน” รองรับ “เงินสด”, “QR แบบรูปภาพ”, “QR พร้อมเพย์แบบกรอกเลข”, “เครื่องรูดบัตร” และ “อื่น ๆ” โดยวิธีชำระแบบเงินสดตั้งปุ่มธนบัตรลัดได้ QR แบบรูปภาพเก็บรูป QR ที่อัปโหลดไว้ QR พร้อมเพย์แบบกรอกเลขใช้เลขพร้อมเพย์และชื่อผู้รับถ้ามี วิธีชำระเงินสามารถแก้ไข เรียงลำดับ ตั้งเป็นค่าเริ่มต้น หรือเก็บถาวรเพื่อรักษาประวัติธุรกรรมเดิม
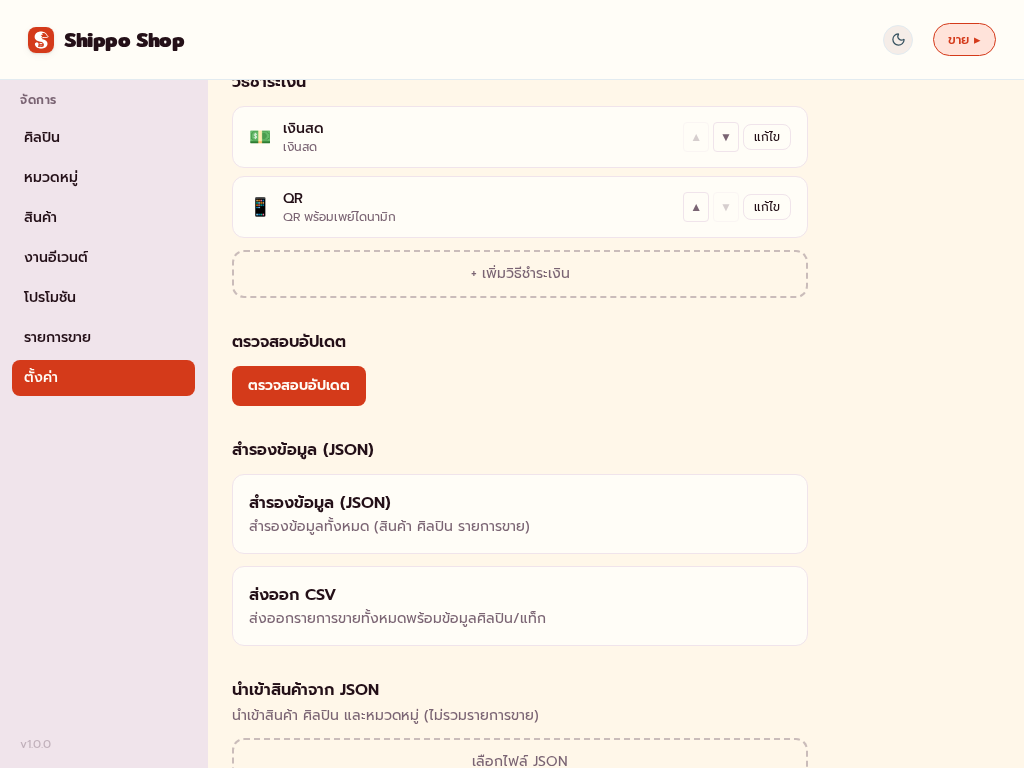
“สำรองข้อมูล (JSON)” และการนำเข้าข้อมูลใช้ส่งออกข้อมูลทั้งหมดเป็นไฟล์ JSON เดียว หรือนำเข้าไฟล์สำรองเดิม ควรส่งออกก่อนย้ายอุปกรณ์ ล้างธุรกรรมเก่า หรือเปลี่ยนข้อมูลสำคัญ
“การใช้พื้นที่จัดเก็บ” แสดงพื้นที่ที่ใช้เก็บในเว็บเบราว์เซอร์ของเครื่อง ถ้าพื้นที่เริ่มเต็ม ให้ส่งออกข้อมูลสำรองก่อน แล้วค่อยพิจารณาล้างธุรกรรมเก่าตามช่วงวันที่หรือลบรูปสินค้าที่ไม่ใช้แล้ว
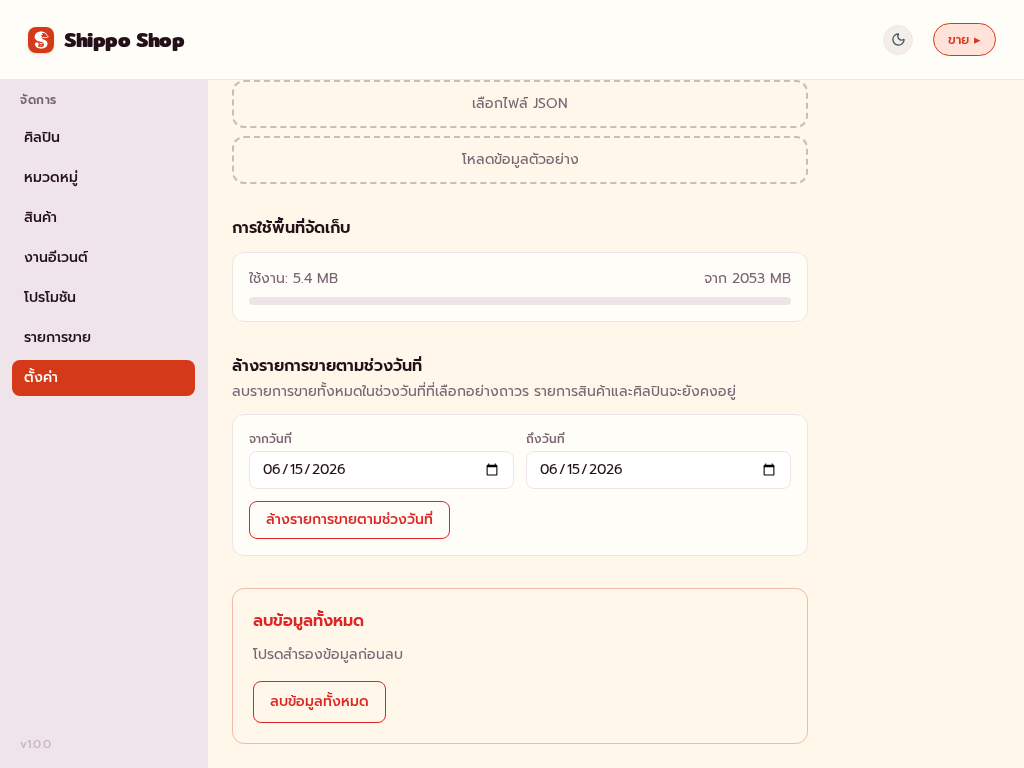
ส่วนคำสั่งขั้นสูงมี “ล้างรายการขายตามช่วงวันที่” และ “ตรวจสอบอัปเดต” การล้างธุรกรรมเป็นการลบถาวรและไม่คืนสต็อก จึงควรทำหลังสำรองข้อมูลเท่านั้น
7. คำถามที่พบบ่อย
Shippo ต้องใช้อินเทอร์เน็ตหรือไม่?
ไม่จำเป็นหลังจากโหลดแอปแล้ว ข้อมูลสินค้า ธุรกรรม และการตั้งค่าถูกเก็บในเบราว์เซอร์ด้วย IndexedDB ตัวบอกสถานะออนไลน์หรือออฟไลน์ในหัวแอปมีไว้บอกสถานะเท่านั้น ไม่ได้บล็อกการขาย
ถ้าปิดแท็บระหว่างขายจะเกิดอะไรขึ้น?
ข้อมูลที่บันทึกแล้ว เช่น สินค้า ธุรกรรมที่ชำระสำเร็จ และการตั้งค่า จะยังอยู่ แต่ตะกร้าปัจจุบันและตะกร้าที่พักไว้เก็บในความจำเครื่อง จึงอาจหายถ้าปิดแท็บหรือปิดเซสชันเบราว์เซอร์ ระหว่างงานควรเปิดแท็บ POS หลักไว้ตลอด ถ้าต้องแก้ปัญหา ให้รีโหลดแท็บเดิมแทนการปิดแท็บ หรือแจ้งปัญหาเข้ามาได้ที่ X/Twitter ของ Shippo
เปลี่ยนภาษาและธีมได้อย่างไร?
เลือกภาษาได้ตอนตั้งค่าครั้งแรก และเปลี่ยนภายหลังได้ใน “จัดการ” > “ตั้งค่า” เมื่อเปลี่ยนภาษา ข้อความ วันที่ และรูปแบบตัวเลขจะอัปเดตทันที ปุ่มสลับธีมสว่าง/มืดอยู่ในหัวหน้าจอ และโหมด “ขาย” กับ “จัดการ” จะจำค่าธีมแยกกัน
สินค้าหายจากแคตตาล็อกเพราะอะไร?
ส่วนใหญ่เกิดจากสินค้าถูก “เก็บถาวร” เพราะการลบสินค้าใน “จัดการ” > “สินค้า” เป็นการซ่อนสินค้าเพื่อรักษาประวัติธุรกรรม ไม่ใช่การลบประวัติย้อนหลัง ในรุ่นปัจจุบันยังไม่มีหน้ากู้คืนสินค้าที่เก็บถาวรแล้ว ถ้าลบผิด ให้กู้จากไฟล์สำรอง JSON หรือสร้างสินค้าใหม่
ลบหมวดหมู่แล้วทำไมสินค้ากลายเป็นไม่มีสี?
การลบหมวดหมู่จะไม่ลบสินค้า แต่สินค้าที่เคยอ้างอิงหมวดหมู่นั้นจะไม่มีสีหรือไอคอนหมวดหมู่ให้แสดงในหน้า “ขาย” ข้อมูลสินค้า ราคา และสต็อกยังอยู่เหมือนเดิม
ตะกร้าที่พักไว้หายไปไหน?
ตะกร้าที่พักไว้เก็บในของเครื่อง เช่นเดียวกับตะกร้าหลัก ถ้าปิดแท็บหรือปิดเซสชันเบราว์เซอร์ ตะกร้าที่พักไว้อาจหายได้ โดย Shippo รองรับตะกร้าพักได้สูงสุด 5 ตะกร้า
”ยกเลิกรายการ” ต่างจากการลบอย่างไร?
“ยกเลิกรายการ” คือการยกเลิกรายการขายโดยยังเก็บประวัติไว้และคืนสต็อก ยอดขายที่ยกเลิกแล้วจะไม่ถูกรวมในรายงานรายได้ ส่วนการลบรายการขายปกติไม่มีใน flow ทั่วไป มีเพียง “ล้างรายการขายตามช่วงวันที่” ใน “ตั้งค่า” ซึ่งเป็นการลบถาวรและไม่คืนสต็อก
เห็นข้อความว่ามีอัปเดต ควรทำอย่างไร?
เมื่อมีเวอร์ชันใหม่ Shippo จะแสดงข้อความให้รีโหลดหน้าแอปเพื่อใช้เวอร์ชันล่าสุด การรีโหลดจะอัปเดตแอปโดยเก็บข้อมูลในเครื่องไว้ สามารถตรวจสอบอัปเดตเองได้จาก “จัดการ” > “ตั้งค่า” > “ตรวจสอบอัปเดต”
สำรองหรือย้ายข้อมูลไปเครื่องอื่นอย่างไร?
ไปที่ “จัดการ” > “ตั้งค่า” แล้วใช้ “สำรองข้อมูล (JSON)” เพื่อดาวน์โหลดไฟล์ JSON จากนั้นนำเข้าไฟล์ JSON บนเครื่องหรือเบราว์เซอร์ใหม่เพื่อโหลดข้อมูลเดิม ควรสำรองก่อนล้างธุรกรรม ย้ายอุปกรณ์ หรืออัปเดตครั้งใหญ่
พื้นที่จัดเก็บใกล้เต็มควรทำอย่างไร?
ตรวจดู “การใช้พื้นที่จัดเก็บ” ใน “ตั้งค่า” ก่อน ถ้าใกล้เต็ม ให้ส่งออกข้อมูลสำรอง แล้วค่อยล้างธุรกรรมเก่าตามช่วงวันที่หรือลบรูปสินค้าที่ไม่จำเป็น
สินค้าขึ้นว่าหมด แต่ยังมีของอยู่ เกิดจากอะไร?
ตรวจสต็อกใน “จัดการ” > “สินค้า” ถ้าสินค้าไม่ได้ตั้งเป็น “ไม่จำกัด” Shippo จะลดสต็อกทุกครั้งที่ขาย และต้องเติมสต็อกเอง ถ้าสินค้ามีรูปแบบสินค้า ให้ตรวจสต็อกของแต่ละรูปแบบด้วย เพราะแอปติดตามสต็อกแยกกัน
Shippo User Guide
This guide explains how to use Shippo from first-time setup and daily selling through catalog management, event management, reports, settings, and troubleshooting.
1. Getting Started
First-Time Setup
On first launch, Shippo shows a welcome screen with a language selector. Thai is the default, and English can be selected from the same screen. The welcome screen also shows the app version and a Get Started button that opens the setup form.
Complete the main shop or event details:
- Shop Name: required. This appears in the app header and on receipts, for example “Shippocon 2026”.
- Currency: choose THB or USD. (other currencies are unsupported until further updates) This controls how money is formatted throughout the app.
- Tax Rate: enter a percentage from 0 to 100. The default is 0%. If the rate is above 0, tax is added to receipts.
- Tax Label: the label shown on the receipt tax line, such as “VAT” or “Service Charge”.
- Import from Backup: upload a previously exported JSON backup to restore an existing catalog and app data.
- Load Demo Data: fills the app with sample artists and products for testing or demonstrations.
After setup, Shippo automatically creates a default Cash payment method and one initial artist, then opens the Sell view.
2. Installing Shippo as an App
PWA Installation
Shippo is a Progressive Web App, so it can be installed from the browser and used like a regular app. Once installed, it has its own icon, opens without the browser address bar, and can continue working offline after the app has been loaded.
The installed app name is “Shippo”, using the app’s red and cream theme. Installation depends on the device:
- Chrome or Edge on desktop: use the install icon in the address bar or the browser menu’s Install option.
- Chrome on Android: use Add to Home screen or Install app from the prompt or browser menu.
- Safari on iPhone or iPad: tap Share, then Add to Home Screen. iOS and iPadOS do not show automatic PWA install prompts.
Installing Shippo is recommended for event terminals because a tablet or laptop becomes a dedicated POS screen. Staff can launch it with one tap, use it full-screen, and avoid losing the POS among browser tabs.
When a new version is available, Shippo shows an update prompt. Reloading applies the update while preserving local data such as products, transactions, and settings.
3. Sell View
Product Catalog
The Sell view is the main sales screen. It is split into the product catalog and the cart. On large screens, the catalog is on the left and the cart is on the right. On smaller screens, the cart appears as a drawer.
If an event is selected, an active event strip appears at the top with the event name and location. The selected event controls which event-specific promotions can apply. If more than one event exists, staff can select the active event before selling.
The category bar filters the catalog. It includes an All tab plus one tab for each configured category from Manage > Categories. Staff can open the search field to filter products by name or SKU in real time. A clear button appears when search text is present.
Product cards show the image, name, price, and stock status. Products are grouped into in-stock and out-of-stock sections. Out-of-stock cards are dimmed and cannot be added to the cart. If a product has variants, such as sizes or colors, tapping the product opens a variant picker before adding it to the cart.
Cart
The cart shows the current order number, such as “#001”, and a held-cart count when any carts are on hold. Hold Cart saves the current cart temporarily so staff can serve another customer and return later. Up to five carts can be held. Clear Cart requires a press-and-hold countdown of about five seconds to prevent accidental clearing.
Each cart line shows the category color dot, quantity, product name, variant name if present, and line total. Tapping a line expands it to show the unit price, quantity calculation, and plus/minus quantity controls.
Order-level discounts can be applied as either a percentage or a fixed amount. After a discount is applied, the cart shows the discount type and amount with a button to remove it. The note field stores optional order notes, such as customer requests or counter pickup instructions.
Qualified automatic promotions appear with their savings amounts. Each promotion can be removed for the current order with Restore. The order summary shows subtotal, discounts, tax when configured, cash tendered and change during cash checkout, and the final grand total.
The active cart and held carts are stored in sessionStorage. They survive a normal page reload, but can be lost if the browser tab or session is fully closed during a sale.
4. Checkout and Receipts
Cash
When staff choose cash checkout, Shippo shows a numeric keypad with digits, backspace, a “00” shortcut, and a clear-all button. Quick banknote buttons, such as 20, 50, 100, 500, and 1000 baht, help staff enter tendered amounts faster. These denominations can be configured in Settings.
The tendered amount is shown prominently, and change is calculated live as the amount changes. Charge Now completes the sale after payment is received.
QR and PromptPay
Static QR checkout shows a pre-uploaded QR image. The customer enters the amount manually in their banking app, and staff press Charge Now after confirming payment.
Dynamic QR checkout generates a QR code for the exact order total. If the cart contains products from multiple artists with PromptPay IDs, Shippo shows an artist picker before generating the QR. The screen shows loading and error states if QR generation fails.
Other Payment Methods
Card and other payment methods show a simple confirmation screen with Charge Now. These methods do not connect to external payment providers in the current flow.
Receipts
After a successful charge, Shippo shows a receipt with the order number, timestamp, itemized lines, quantities, unit prices, line totals, discounts, promotions, tax, payment method, cash tendered and change when relevant, and the grand total.
The receipt automatically returns to the Sell view after the configured delay. The default is 5 seconds, and the setting can be changed from 0 to 60 seconds. Setting it to 0 disables auto-advance, so staff must dismiss the receipt manually. After a sale, Shippo shows a low-stock notification if any item falls at or below the configured threshold.
5. Catalog and Event Management
Manage Mode
Manage mode is for shop owners and event administrators. The sidebar includes Artists, Categories, Products, Events, Promotions, Transactions, and Settings. The Sell link in the header returns to the sales screen. Sell mode and Manage mode keep separate light/dark theme settings.
Artists
Artists separate product ownership, reports, and dynamic QR payment routing. The list shows both active and inactive artists, with inactive artists marked clearly.
Artist fields include name, identifying color, and optional PromptPay ID. If a PromptPay ID is set, the artist can receive dynamic QR payments. When an artist has linked products or historical transactions, Archive marks the artist inactive instead of removing historical references.
Categories
Categories organize products in the Sell view. Each category has a name, icon, and color. The color appears on product cards and cart lines. Reordering categories changes the order of category tabs in the Sell view.
Deleting a category does not delete products. Products that referenced the deleted category simply lose that category color or grouping in the catalog.
Products and Variants
Products lists non-archived products and can be searched by name or SKU. Product fields include name, price, artist, category, stock, SKU, notes, tags, and product image. Uploaded images are compressed automatically.
If a product should not track stock, mark it as unlimited stock. Unlimited products do not become out of stock from sales. For products with options, such as size, color, or alternate pricing, add variants. Each variant has its own name, price, image, and stock. In the Sell view, products with variants open a variant picker before being added to the cart.
Archive hides a product from the Sell catalog and Products list without breaking past transaction records. If a product is archived by mistake, the user-facing recovery path is to restore from a backup or recreate the product.
Stock Updates and CSV Import
Bulk Stock Manager adjusts stock for many products or variants at once. It includes search, filtering, and batch quantity changes, which is useful before opening a booth or restocking during the event.
CSV Import accepts .csv files with a header row. Expected columns are Name, Price, Artist, Category, Stock, and SKU. Shippo validates each row, reports row-level errors, and automatically creates missing Artists or Categories.
Promotions
Promotions create automatic discounts. They can be enabled, disabled, searched, and filtered by event or status. There are three promotion types:
- Spend Threshold: when the order reaches a minimum spend, the customer receives a percentage or fixed discount.
- Item Bundle: when the required product or variant reaches the required quantity, a target product receives a discount.
- Item Discount: a selected product or variant receives a per-unit discount after a minimum quantity is reached.
Promotions can be global or scoped to a specific event. Event-scoped promotions apply only when that event is active in the Sell view. Each scope can have up to 10 active promotions. Shippo blocks activating an 11th promotion in the same scope.
Events and Event Recap
Events track sales by event or selling period. Event fields include name, start time, end time, location, and description. Finished events can be archived so they remain available for historical sell-through comparisons.
Event Recap shows event KPIs such as total revenue, item count, order count, and discounts. It also includes filtered transactions, sell-through comparison against archived events, artist split, category split, and tag split.
6. Transactions, Reports, and Settings
Transactions
Transactions lives under Manage > Transactions and includes both Sales and Report modes. Sales mode shows a paginated transaction list with Today and All-time filters. Each row shows the order number, timestamp, total, payment method, item count, and detail actions.
Transaction detail shows line items, discounts, tax, total, payment method, cash tendered and change when relevant, promotions, and order notes. To cancel a sale, use Void instead of deleting. Void keeps the record for audit, restores sold stock, and excludes the transaction from revenue KPIs and reports.
Unvoid reverses a void by deducting stock again. If current stock is insufficient, Shippo blocks the unvoid action and shows a warning until stock is adjusted.
Reports
Report mode has four sub-tabs: Overview, Events, Sell-Through, and Artists. Use Overview for daily operating numbers, Events for event comparison, Sell-Through for product movement, and Artists for vendor or artist performance.
In Overview, choose Today, Last 7 days, or a custom date range, and optionally filter by event. KPI cards include total revenue, tax collected, item count, order count, average order value, and discount total. The tab also includes an hourly sales chart and breakdowns by artist, category, or tag.
Events Comparison compares multiple events by revenue, item count, and order count. Sell-Through Analysis shows which products sold well or moved slowly. Artist Performance shows revenue, items sold, attributed discounts, and commission-oriented figures.
Settings
Settings controls shop details, payment methods, backups, storage, and advanced actions.
Shop settings include shop name, language, currency, tax rate, tax label, low-stock threshold, and receipt auto-advance. Receipt auto-advance accepts 0-60 seconds; setting it to 0 turns off automatic return from the receipt screen.
Payment Methods Manager supports cash, static QR, dynamic QR, card, and other payment methods. Cash methods can define quick denomination buttons. Static QR stores an uploaded QR image. Dynamic QR uses a PromptPay ID and optional recipient name. Payment methods can be edited, reordered, set as default, or archived to preserve past transaction references.
Data Import / Export lets the owner export all data to one JSON backup or import a previous backup. Export before switching devices, clearing old transactions, or making major changes.
Storage Usage shows IndexedDB usage against the browser quota. If storage is getting full, export a backup first, then consider clearing old transactions by date range or removing unused product images.
Advanced includes Clear Transactions by Date Range and Check for App Updates. Clearing transactions is permanent and does not restore stock, so it should only be done after exporting a backup.
7. FAQ
Does Shippo need an internet connection?
Not after the app has loaded. Products, transactions, and settings are stored locally in the browser using IndexedDB. The online/offline indicator in the header is informational and does not block selling.
What happens if the tab is closed during a sale?
Saved data, such as products, completed transactions, and settings, remains safe. The active cart and held carts are stored in sessionStorage, so they may be lost if the tab or browser session is closed. During an event, avoid closing the POS tab. If needed, reload the same tab instead.
Why is there no warning for multiple tabs?
The current build does not warn or block multiple Sell tabs, even though a future guard exists in code. Use one primary POS tab during selling to reduce confusion.
How do I change language and theme?
Language is selected during setup and can be changed later in Manage > Settings. Changing language updates UI text, dates, and number formatting immediately. The light/dark theme toggle is in the header, and Sell mode and Manage mode store their theme preferences separately.
Why did a product disappear from the catalog?
Most often, the product was archived. Deleting from Manage > Products hides the product to preserve transaction history rather than removing historical records. The current build does not provide a restore UI for archived products. If a product was archived by mistake, restore from a JSON backup or recreate it.
Why did products become uncolored after deleting a category?
Deleting a category does not delete products. Products that referenced that category simply lose the category color or icon in the Sell view. Product details, price, and stock remain intact.
Where did my held cart go?
Held carts are stored in sessionStorage, like the active cart. If the browser tab or session is closed, held carts may be lost. Shippo supports up to five held carts.
What is the difference between Void and Delete?
Void cancels a sale while keeping the record and restoring stock. Voided sales are excluded from revenue reports. A normal transaction-level Delete action is not part of the standard flow. The only deletion-style action is Clear Transactions by Date Range in Settings, which is permanent and does not restore stock.
What should I do when an update prompt appears?
When a new version is available, Shippo prompts you to reload. Reloading updates the app while keeping local data. You can also check manually from Manage > Settings > Advanced.
How do I back up or move data to another device?
Go to Manage > Settings > Data and use Export All Data to download a JSON backup. On the new device or browser, use Import from File to load that backup. Export before clearing transactions, switching devices, or making major updates.
What should I do when storage is nearly full?
Check Storage Usage in Settings. If storage is nearly full, export a backup first, then clear old transactions by date range or remove unnecessary product images.
Why does a product show out of stock when I still have inventory?
Check stock in Manage > Products. If a product is not set to unlimited stock, Shippo deducts stock after each sale and must be restocked manually. If the product has variants, stock is tracked per variant, so check each variant separately.